Pocket Atlas of
Spine Surgery
Kern Singh
Alexander R. Vaccaro
Pocket Atlas of Spine Surgery
Pocket Atlas of Spine Surgery
Kern Singh, MD
Assistant Professor
Department of Orthopaedic Surgery
Rush University Medical Center
Chicago, Illinois
Alexander R. Vaccaro, MD, PhD
The Everrett J. and Marion Gordon
Professor of Orthopaedic Surgery
Professor of Neurosurgery
Co-Director, Delaware Valley
Spinal Cord Injury Center
Co-Chief, Spine Surgery
Co-Director, Spine Surgery
Thomas Jefferson University
The Rothman Institute
Philadelphia, Pennsylvania
Thieme
New York · Stuttgart
Thieme Medical Publishers, Inc.
333 Seventh Ave.
New York, NY 10001
Executive Editor: Kay Conerly
Editorial Assistants: Daniel de Corral
Editorial Director, Clinical Reference: Michael Wachinger
Production Editor: Kenneth L. Chumbley
Medical Illustrator: Andrew Evansen
International Production Director: Andreas Schabert
Senior Vice President, International Marketing and Sales: Cornelia Schulze
Vice President, Finance and Accounts: Sarah Vanderbilt
President: Brian D. Scanlan
Compositor: Prairie Papers Inc.
Printer: Asia Pacific Offset
Library of Congress Cataloging-in-Publication Data
Singh, Kern.
Pocket atlas of spine surgery / Kern Singh, Alexander R. Vaccaro.
p. ; cm.
ISBN 978-1-60406-308-0 (alk. paper)
I. Vaccaro, Alexander R. II. Title.
[DNLM:
1. Spine—surgery—Atlases.
2. Spine—surgery—Handbooks. WE 17]
617.471--dc23
2011040811
Copyright © 2012 by Thieme Medical Publishers, Inc. This book, including all parts thereof, is
legally protected by copyright. Any use, exploitation, or commercialization outside the nar-
row limits set by copyright legislation without the publisher’s consent is illegal and liable to
prosecution. This applies in particular to photostat reproduction, copying, mimeographing or
duplication of any kind, translating, preparation of microfilms, and electronic data processing
and storage.
Important note: Medical knowledge is ever-changing. As new research and clinical experi-
ence broaden our knowledge, changes in treatment and drug therapy may be required. The
authors and editors of the material herein have consulted sources believed to be reliable in
their efforts to provide information that is complete and in accord with the standards ac-
cepted at the time of publication. However, in view of the possibility of human error by the
authors, editors, or publisher of the work herein or changes in medical knowledge, neither the
authors, editors, nor publisher, nor any other party who has been involved in the preparation
of this work, warrants that the information contained herein is in every respect accurate or
complete, and they are not responsible for any errors or omissions or for the results obtained
from use of such information. Readers are encouraged to confirm the information contained
herein with other sources. For example, readers are advised to check the product information
sheet included in the package of each drug they plan to administer to be certain that the infor-
mation contained in this publication is accurate and that changes have not been made in the
recommended dose or in the contraindications for administration. This recommendation is of
particular importance in connection with new or infrequently used drugs.
Some of the product names, patents, and registered designs referred to in this book are in fact
registered trademarks or proprietary names even though specific reference to this fact is not
always made in the text. Therefore, the appearance of a name without designation as propri-
etary is not to be construed as a representation by the publisher that it is in the public domain.
Printed in China
5 4 3 2 1
ISBN 978-1-60406-308-0
I dedicate this book to my father. As I now progress into parenthood, I realize
the sacrifices you made for me. Never ending patience, bountiful amounts of
time, and a dedication to giving me every opportunity to succeed.
K. Singh
This book is dedicated to my one and only true hero, my father, Alexander Vac-
caro, Senior, who to this day I look to for guidance and wisdom in all aspects
of my life.
A. Vaccaro
Contents
Foreword
ix
Preface
xi
I Introduction
1
Cervical Surgical Positioning
3
2
Thoracic and Lumbar Surgical Positioning
6
II Cervical
3
Anterior Cervical Diskectomy and Fusion
13
4
Anterior Cervical Corpectomy and Fusion
21
5
Open Posterior Cervical Foraminotomy
27
6
Minimally Invasive Posterior Cervical Foraminotomy
30
7
Occipitocervical Fusion
34
8
Posterior Cervical Laminectomy and Fusion
41
9
Posterior Cervical Laminaplasty with Instrumentation
46
III Thoracic Spine
10
Percutaneous Cement Augmentation
53
11
Thoracic Pedicle Screw Placement
60
12
Minimally Invasive Thoracic Corpectomy
64
IV Lumbar Spine
13
Open Laminectomy and Diskectomy
73
14
Open Posterolateral Lumbar Fusion
80
15
Minimally Invasive Lumbar Exposure
85
16
Minimally Invasive Laminectomy
89
17
Minimally Invasive Far Lateral Diskectomy
93
18
Minimally Invasive Transforaminal Lumbar Interbody Fusion
99
19
Mini-Open Pedicle Screw Placement
108
vii
viii
Contents
20 Percutaneous Pedicle Screw Placement
113
21 Extreme (eXtreme) Lateral Interbody Fusion
124
22 Minimally Invasive Lumbar Corpectomy
130
23 Anterior Lumbar Interbody Fusion
134
Foreword
So why would another atlas of spine surgery be needed, one may ask? Well, in
this unique, singularly authored (Singh) and edited (Vaccaro) new pocket atlas,
one will find the most anatomic-specific, approach-centric, consistent mate-
rial on a myriad of the most common spinal surgical techniques I have ever
seen. The innovative manner of providing a clear anatomic description of the
“target spine anantomy,” core to any spinal surgery, within the context of the
surrounding anatomy, as well as the layers of dissection required to get there,
is absolutely brilliant and highly instructive. It produces a nearly three-dimen-
sional anatomic perspective rarely obtained in a textbook, which is important
not only for conventional open surgical techniques, but mini-open, minimally
invasive, and percutaneous procedures as well.
The atlas is organized anatomically into sections on positioning, cervical,
thoracic, and lumbar surgery. Within those sections it covers the most com-
mon spinal surgeries with specific and useful text accompanying the wonder-
ful pictures, intraoperative photos, and drawings. I was especially pleased to
note a constant focus on proper visualization through adequate hemostasis
and precise anatomic relevance to the procedures, as these are two of the most
essential principles to successful spine surgery in my experience. The chapters
can be covered quickly and reflect on the well laid out combination of labeled
illustrations and accompanying text. This atlas avoids having too much irrel-
evant detail and excessive text to detract from the illustrations, which adds to
the optical aesthetics of the material and allows quick and easy learning.
The primary audience for this atlas is obviously the young practicing sur-
geon, along with medical students, residents, and fellows learning spinal sur-
gery. However, with its emphasis (almost 50 percent of the text) on the newer
and challenging techniques of minimally invasive spinal surgery, even senior
surgeons adopting these type of surgeries into their practice would benefit
from the precise and useful material. Additionally, anyone else involved in the
care of spine surgery patients, from the scrub nurse to the preop counseling
nurse or surgeon assistant, would gain valuable insight into these surgeries.
Finally, this atlas would be a tremendous teaching manual for prospective pa-
tients as well.
I congratulate Dr. Singh and Dr. Vaccaro for their efforts on this most practi-
cal and useful atlas.
Lawrence G. Lenke, MD
Jerome J. Gilden Professor of Orthopedic Surgery
Co-Chief of Pediatric and Adult Spinal Reconstructive Surgery
Washington University Department of Orthopedic Surgery
St. Louis, Missouri
ix
Preface
Spinal surgery atlases are abundant, and the myriad of options can overwhelm
any practicing medical professional. However, these atlases tend to be large
and too cumbersome to bring into the operating room.
This atlas was created to serve a much different purpose. Aside from its
most obvious advantage of being extremely pocket-friendly, several other
features make it shine. The illustrations are detailed, providing not only vi-
sualization of the operative field using actual, intraoperative, high-definition
photographs, but also have beautifully illustrated “see through” adjacent anat-
omy. The reader is allowed to visualize the entire surgical field, including the
anatomy that is never “seen” while operating. This translucent view into com-
plex spinal anatomy helps the reader understand the subtleties of technically
demanding techniques such as minimally invasive spinal surgery.
This atlas is thorough, providing detailed anatomic photographs and illus-
trations of the most common surgical techniques, both open and minimally
invasive. Each procedure chosen was carefully selected to highlight the most
common procedures performed by a practicing spine surgeon. In addition,
MIS techniques that are very technically demanding have been incorporated,
which allows the surgeon to understand the surrounding nonvisualized anat-
omy. The artwork allows the reader to become comfortable with the surgery
before setting foot in the operating room. The accompanying text not only
describes the surgical technique, but also offers pearls and tips to help perform
the procedure expeditiously. Common complications are described, as well as
suggestions for their avoidance.
This atlas will serve as a valuable resource not only for orthopedic surgeons,
neurosurgeons, and surgical trainees such as residents and fellows, but also for
physician assistants, nursing staff personnel, and anyone else involved in the
operative care of patients undergoing spinal surgery.
xi
1 Cervical Surgical Positioning
■ Anterior Cervical
foam pad
doughnut to
stabilize head
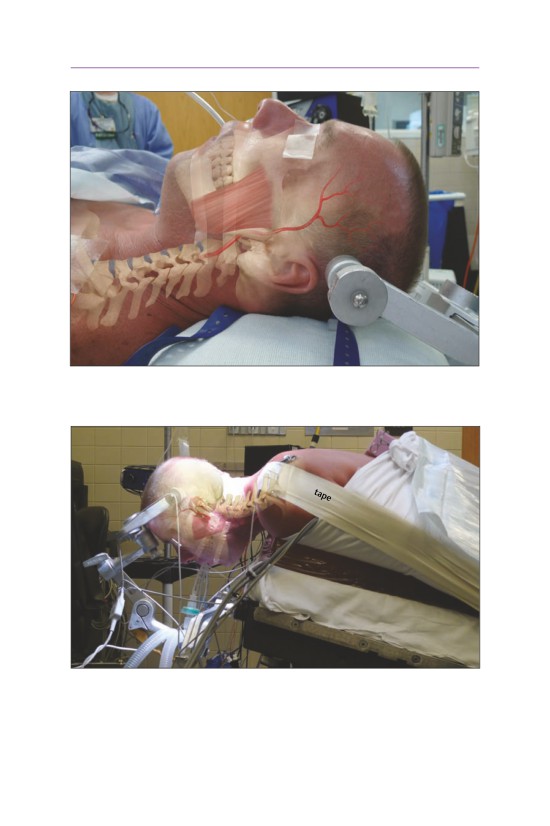
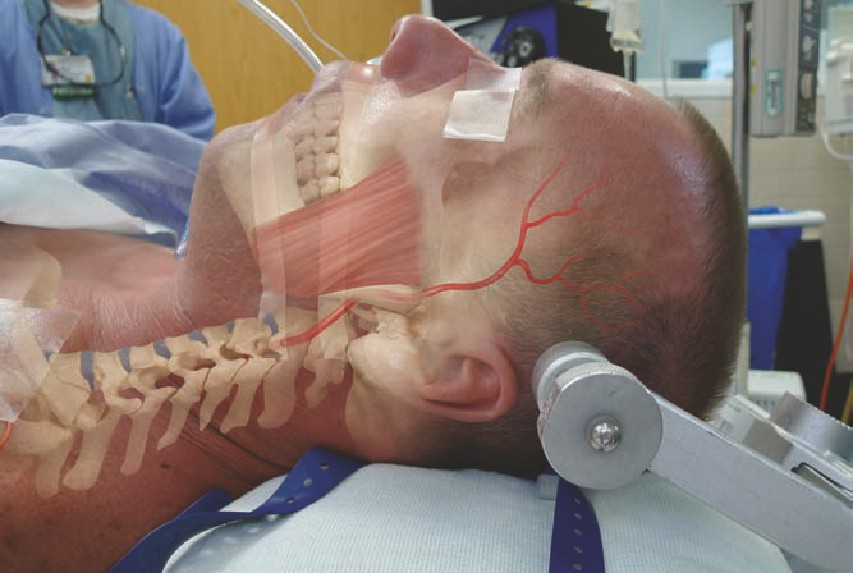
• The head is placed onto a doughnut to maintain its position. A bump or roll
is placed horizontally across the scapulae to allow for gentle extension of the
cervical spine. Care should be taken to avoid hyperextension in patients with
spinal cord compression and myelopathy. Tape is applied to the top of the
shoulders to depress them gently for improved visualization of the lower cervi-
cal segments. A foam pad is placed over the elbows to protect the ulnar nerve.
3
4
I
Introduction
■ Posterior Cervical
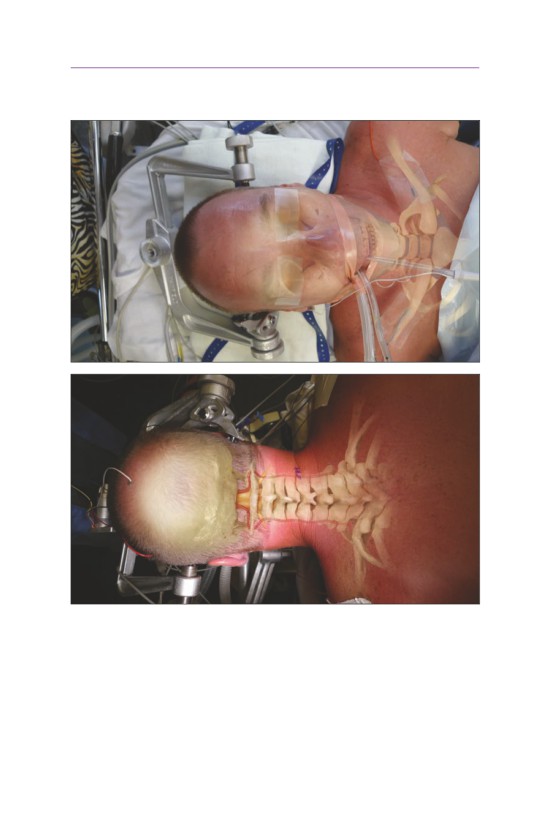
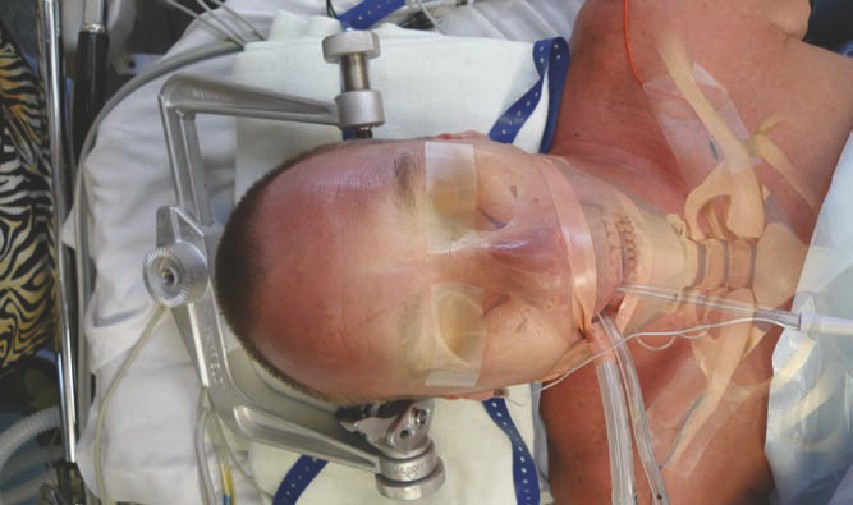
• The Mayfield is placed with the pins along the mastoid process and posterior
to the temporal artery and masseter muscle. The pins are typically tightened
to 60-80 psi.
1 Cervical Surgical Positioning
5
• The table is slightly raised with the head above the feet to allow for venous
drainage.
chest rolls
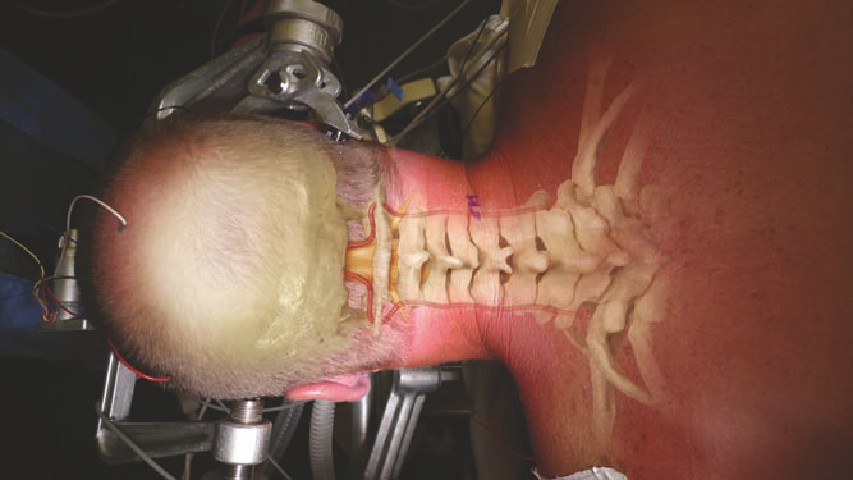
• The patient is then placed into a prone position with chest rolls and the May-
field locked into the operative position. Flexion of the neck allows for opening
of the spinal canal and easier decompression. A more neutral alignment should
be performed prior to placement of the final instrumentation. The arms are
gently taped with a gentle depression of the shoulders to allow for increased
visualization of the lower cervical segments.
2 Thoracic and Lumbar Surgical
Positioning
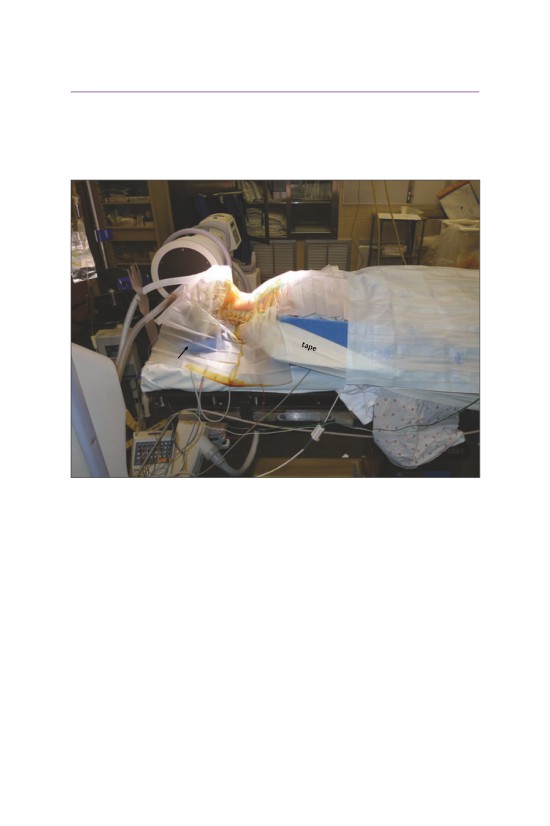
■ Anterior Lumbar
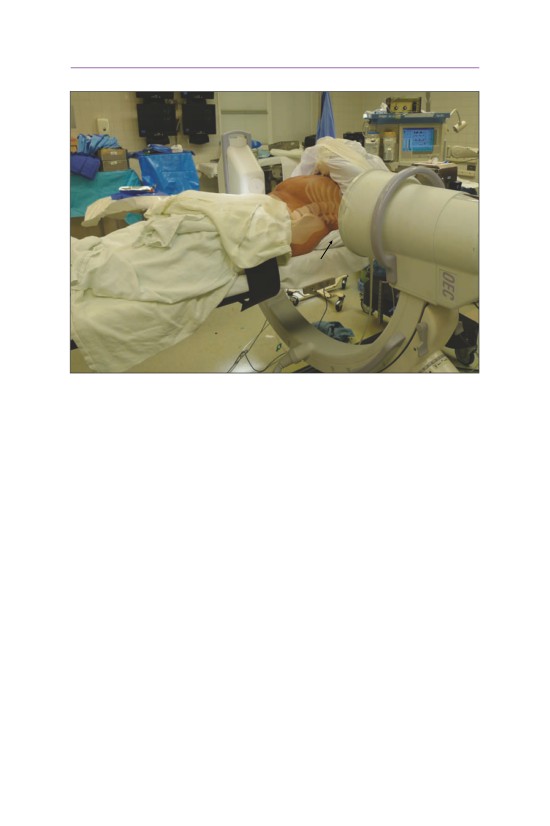
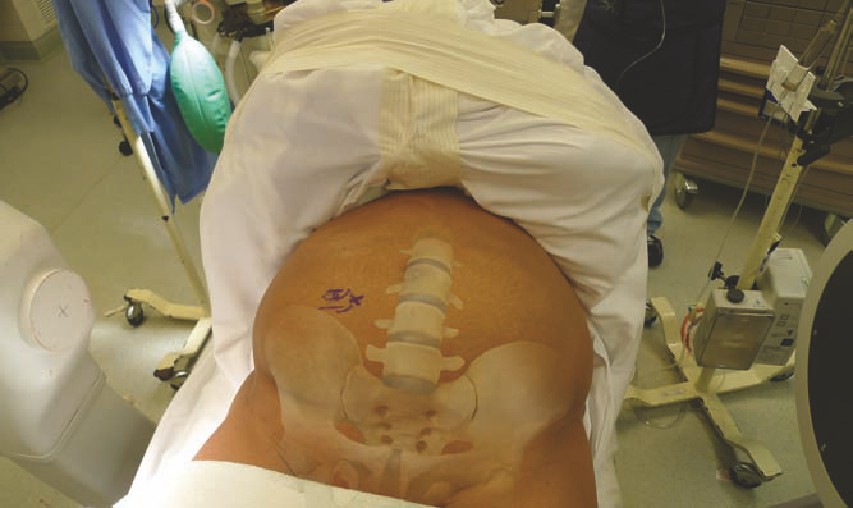
• The patient is positioned with his or her arms across the chest. This allows for
the c -arm to be moved cephalad in the field. A lateral c -arm is essential for local-
ization and implant placement.
6
2 Thoracic and Lumbar Surgical Positioning
7
bump
• Additionally, the table can be positioned with the head lower than the feet, al-
lowing the abdominal contents to fall away from the operative field.
- A bump may be placed under the sacrum to increase lordosis.
8
I
Introduction
■ Lateral Thoracic/Lumbar
axillary
bump
roll
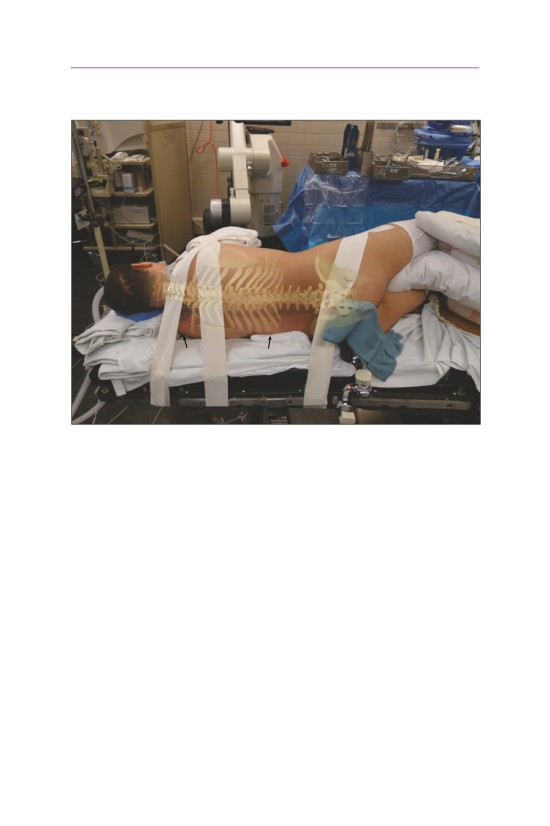
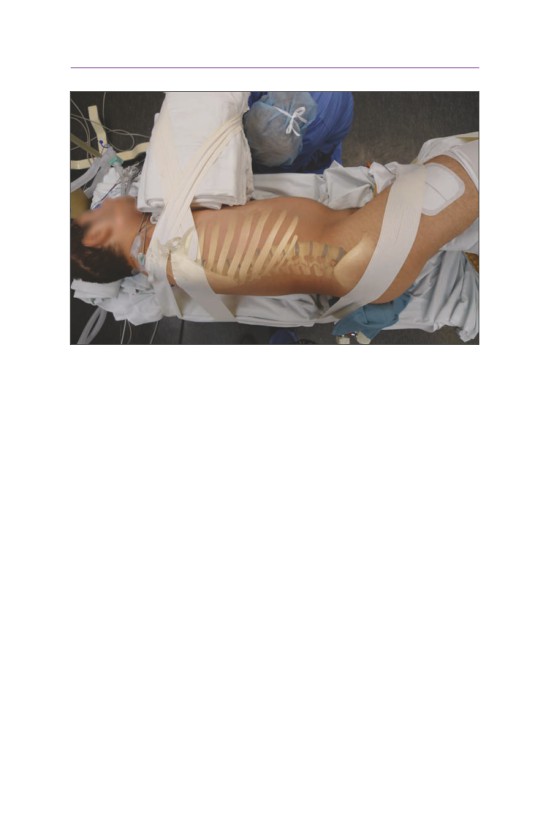
• The patient is positioned on a regular operating room table with a bump un-
derneath the affected level. The patient is also positioned with the operative
site over the break in the bed, allowing the patient to be maximally flexed at
the surgical level.
2 Thoracic and Lumbar Surgical Positioning
9
bump
• Tape is used to secure the pelvis and the thorax so that flexion can be accom-
plished without movement of the patient on the operating table. The arms are
well padded, and an axillary roll should be placed under the patient to avoid
any brachial plexopathies.
10
I
Introduction
■ Posterior Thoracic/Lumbar
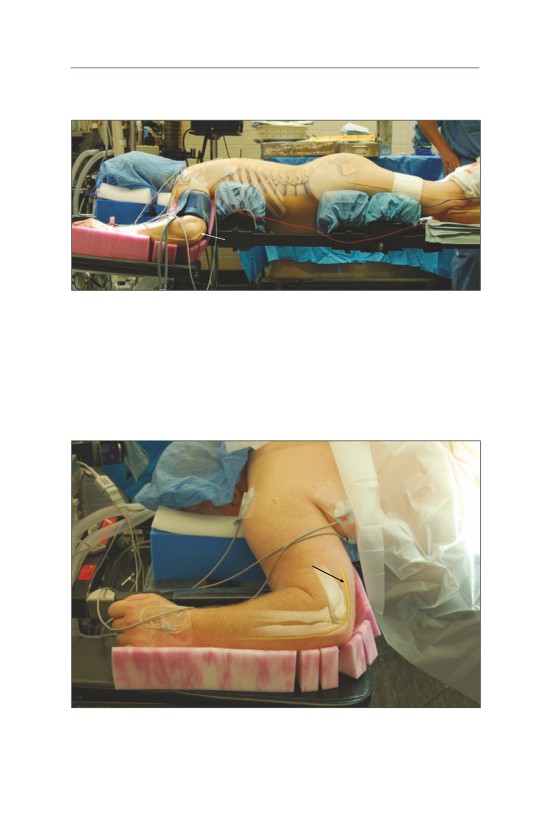
ulnar nerve
• For cases that involve a posterior thoracic and lumbar procedure, the Jack-
son table is often preferred. The Jackson table is radiolucent and allows for
the chest and hip pads to be placed independently. The chest pads should be
placed at the level of the manubrium and below the axilla. The hip pads should
be placed just below the anterior superior iliac spine (ASIS). The thigh pads are
often placed immediately below the hip pad. When the chest and thigh pads
are placed this way, it allows the abdomen to hang freely, decreasing venous
bleeding during the surgical procedure. The neck is placed into a neutral posi-
tion, with care being taken to protect the eyes from pressure.
ulnar
nerve
• The arms are placed into a 90-90 position, with a foam pad placed to prevent
compression along the ulnar nerve. The shoulder should not be hyperextend-
ed, thus decreasing the likelihood of impingement of the rotator cuff.
3 Anterior Cervical Diskectomy
and Fusion
Tips and Pearls Before You Begin
Anatomic landmarks may aid in the placement of the surgical incision. Typically,
the hyoid bone overlies the C3 vertebral body, the thyroid cartilage overlies the
C4-5 intervertebral disk space, and the cricoid ring overlies the C6 level. Disk
space localization is performed with a radiopaque marker and a lateral radio-
graph. Needles for localization should be placed into the vertebral body and not
the disk space to prevent possible disk degeneration in case the wrong level is
localized.
thyroid
thyroid
hyoid
cartilage
gland
bone
mandible
sternum
sternohyoid m.
carotid
trachea
artery
vagus nerve
Superficial landmarks include:
• hyoid C3
• thyroid cartilage C4-5
• cricoid C6
13
14
II Cervical
C6 transverse
process
C7 transverse
process
thyroid
cartilage
thyroid gland
carotid
sheath
• A horizontal incision is made just medial to the sternocleidomastoid muscle (SCM).
• A decision on a right- or left-side approach should be made based upon sur-
geon comfort.
C6 transverse
C7 transverse
process
process
thyroid
thyroid gland
cartilage
external
jugular v.
carotid
sheath
• The platysma is divided in line with the skin incision.
• The external jugular vein helps to identify the tracheoesophageal groove.
3 Anterior Cervical Diskectomy and Fusion
15
thyroid
thyroid
gland
C7
cartilage
sternohyoid m.
omohyoid m.
carotid
sheath
C7
• The SCM and carotid sheath are retracted laterally.
- The tracheoesophageal complex is retracted medially.
- The recurrent laryngeal nerve lies in the tracheoesophageal groove.
- The cartoid sheath contains:
▫ the internal jugular vein
▫ the cartoid artery
▫ the vagus nerve
16
II Cervical
thyroid
gland
C7
thyroid
cartilage
sternohyoid m.
omohyoid m.
carotid
sheath
C7
• The longus colli are swept laterally, exposing the superficial disk space.
- The sympathetic chain lies superficial to the longus colli; therefore, retrac-
tors should be placed deep into this muscle.
• A knife or electrocautery device can be used to perform the annulotomy.
recurrent
ascending
laryngeal n.
cervical
artery
C4-C5
C4
disk
C6
C6-C7
C5
disk
C7
vertebral a.
carotid
sheath
carotid sheath
nerve
roots
• Both straight and curved curettes are used to remove the disk material.
• Caspar pins are used to distract the disk space and to improve visualization of
the posterior intervertebral space.
3 Anterior Cervical Diskectomy and Fusion
17
C4
C4-C5
disk
C5
C6
C6-C7
disk
C7
ascending
cervical a.
vertebral a.
carotid
sheath
vagus a.
nerve
roots
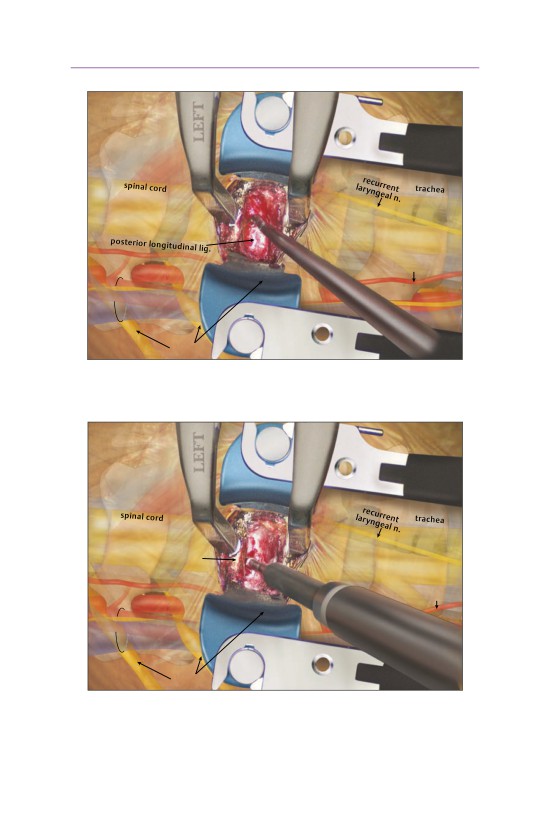
• A microcurette or nerve hook, along with a 1 mm Kerrison rongeur, can be
used to remove the posterior longitudinal ligament.
- A 6-0 angled curette is helpful for getting behind the unciate process.
C4-C5
C4
disk
C5
C6-C7
C6
end plate
disk
C7
ascending
cervical a.
vertebral a.
carotid
sheath
nerve
roots
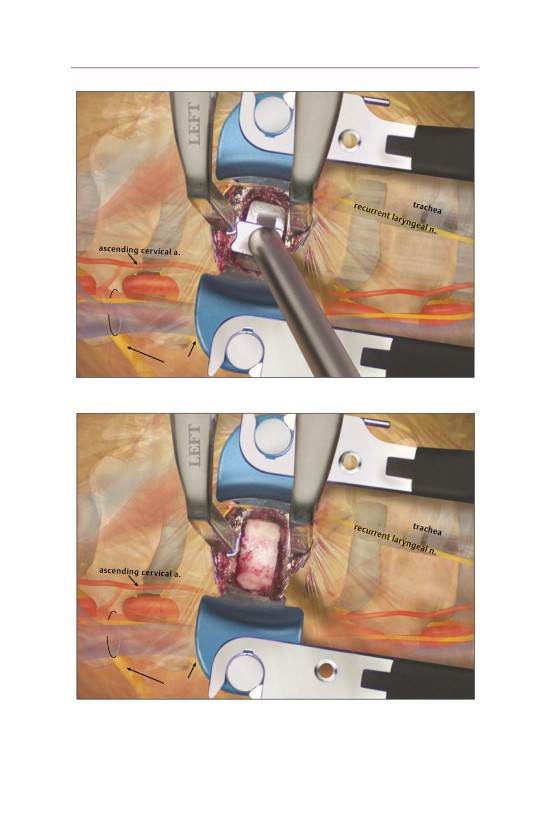
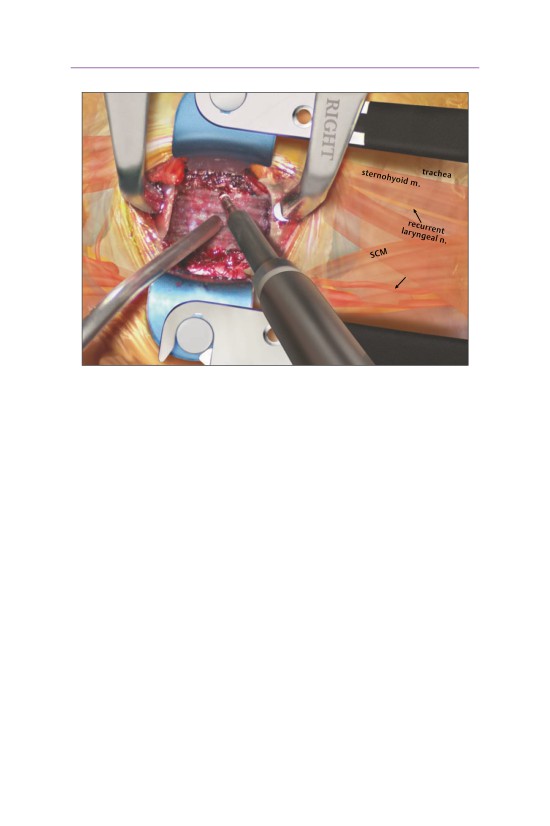
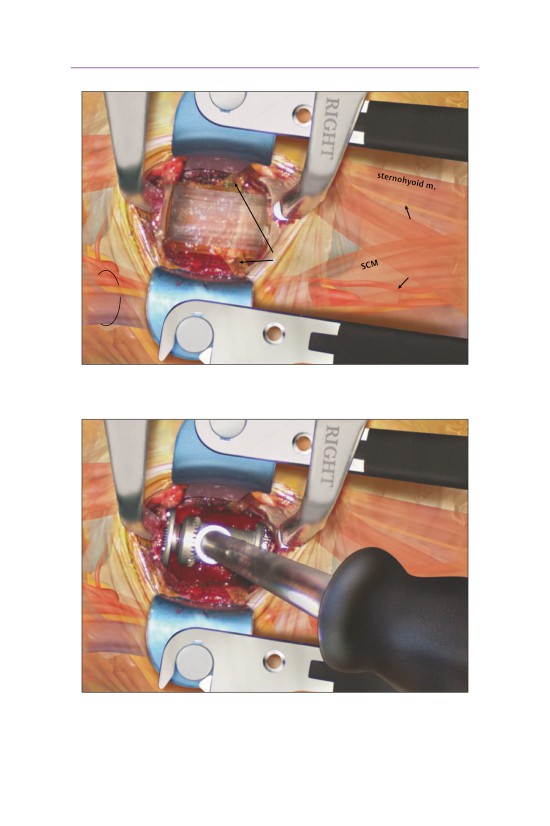
• A high-speed burr is used for decortication of the end plates.
- The burr is also used to create parallel end plates to improve contact be-
tween the bone graft and the end plate.
18
II Cervical
C4
C5
C6
C7
vertebral a.
carotid
sheath
nerve
roots
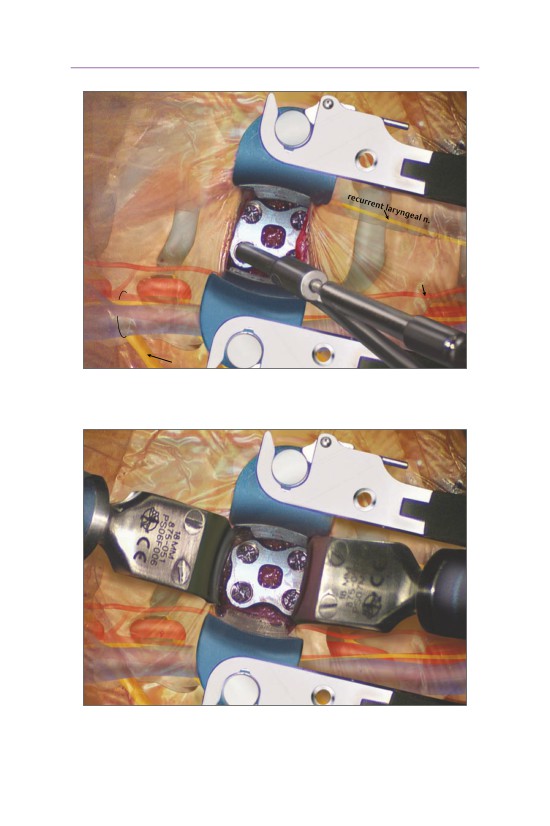
• A trial sizer is placed to approximate the intervertebral space.
C4
C5
C6
C7
vertebral a.
carotid
sheath
nerve
roots
• An appropriately sized bone graft is gently impacted into place.
- The Caspar pins are removed to allow compression across the graft.
▫ Bone wax is placed into the Caspar pin holes to control bleeding.
3 Anterior Cervical Diskectomy and Fusion
19
C4
C5
C6
C7
ascending cervical a.
vertebral a.
carotid
sheath
C4 nerve
root
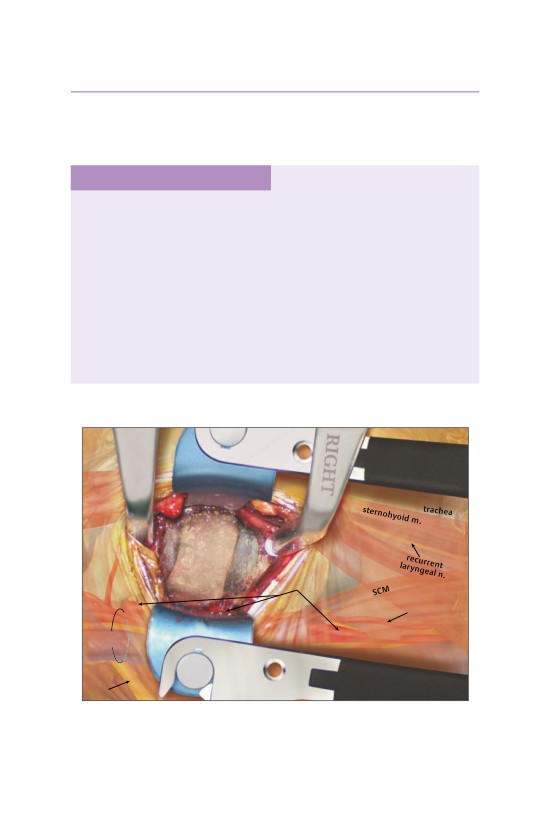
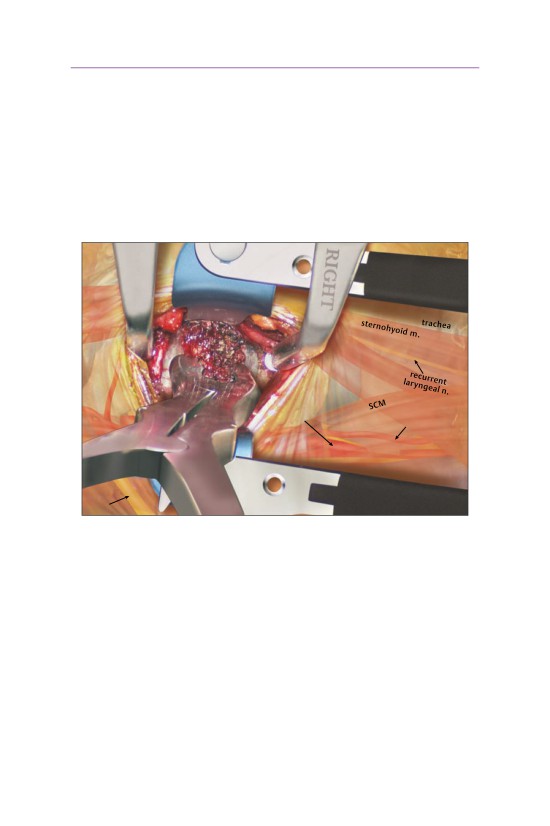
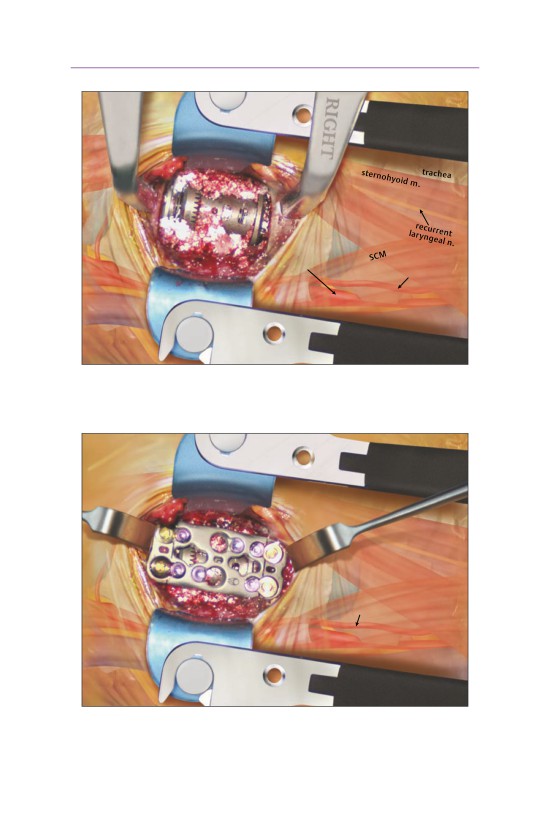
• An anterior cervical plate is applied.
- The shortest feasible plate should be used to avoid abutment of the adjacent
disk space.
• Cervical screws that typically measure 12-16 mm are placed through the plate.
• Depending upon the preference of the surgeon, fixed or variable screws may
be used to allow for controlled subsidence.
20
II Cervical
Potential Pitfalls
The incidence of vocal cord paralysis from recurrent laryngeal nerve injury ranges
from 1% to 11%. Possible etiologies include traumatic division, neuropraxia, com-
pression from postoperative edema, and injury from thermal necrosis. Midline soft
tissue injury to the trachea, esophagus, and pharynx is uncommon. Dysphagia fol-
lowing anterior cervical surgery is common but temporary; it is estimated to occur
transiently in 8% of patients. Simple measures to help reduce the incidence of dys-
phagia include avoiding overzealous retraction of the esophagus, intermittently
relaxing self-retaining retractors during the procedure, and partially deflating the
endotracheal cuff once the cervical retractors are in position. Vascular injuries may
be prevented by avoiding overzealous retraction and by using blunt-edged retrac-
tors. The likelihood of pseudarthrosis may be minimized by performing a meticu-
lous diskectomy and a thorough decortication of the end plates.
4 Anterior Cervical Corpectomy and Fusion
Tips and Pearls Before You Begin
Obtaining proper imaging studies is paramount for optimal surgical treatment.
Careful evaluation of the location and course of the vertebral artery is necessary
to avoid iatrogenic injury. At the time of surgery, complete diskectomies before
resection of the vertebral bodies facilitate assessment of the depth of the vertebral
body as well as the location of the spinal canal. In cases where ossification of the
posterior longitudinal ligament is extremely adherent to the dura, direct resection
can be dangerous. Successful decompression can be performed by removing the
posterior longitudinal ligament on either side of the ossified area and allowing it
to float away anteriorly from the cord (anterior floating technique) without neces-
sitating direct resection. When a corpectomy is performed, a high-speed burr can
be used to resect most of the vertebral body, leaving only a thin rim of posterior
cortical bone. The posterior cortical bone can be removed using either a small
curette or a Kerrison rongeur.
C4-
C5
C5-
disk
C6
C4
C5
disk
C6
C6-C7
vertebral a.
disk
ascending
cervical a.
carotid
sheath
nerve
root
21
22
II Cervical
• Before the corpectomy is begun, the disk space above and below the vertebral
body to be resected is clearly exposed.
• The uncovertebral margin is the most reliable reference in determining the lat-
eral extent of the vertebral body resection.
- A Penfield elevator may be used to palpate the transverse process to ensure
that lateral dissection is sufficient.
▫ The vertebral artery lies deeper than the plane of dissection (posterior
middle third of the vertebral body).
C4
C6-C7
disk
ascending
vertebral a.
cervical a.
carotid
sheath
nerve
root
• A Leksell rongeur can be used to remove most of the vertebral body quickly.
4 Anterior Cervical Corpectomy and Fusion
23
PLL
C4
C6-C7
disk
ascending
cervical a.
carotid
sheath
• A high-speed burr can be used to remove the remaining bone laterally and pos-
teriorly until the posterior longitudinal ligament (PLL) is identified.
- In most cases, an adequate decompression can be accomplished while pre-
serving the PLL, which can then serve to prevent overdistraction from the
interposed graft.
▫ The defect should be widened to the uncovertebral margin to ensure
adequate thecal sac decompression.
24
II Cervical
recurrent
C4
PLL
laryngeal n.
C6
C6-C7
disk
nerve
roots
ascending
cervical a.
carotid sheath
• Bleeding from the cancellous vertebral body can be controlled with gelfoam or
other thrombotic agents.
• The exposed end plates can be used to determine an appropriate size for the
cage or graft.
• If an expandable cage is used, expansion should be performed with lateral
fluoroscopy to prevent overdistraction.
4 Anterior Cervical Corpectomy and Fusion
25
C4
C6-C7
disk
vertebral a.
ascending
cervical a.
carotid
sheath
• The bone graft from the corpectomy site can be placed into and around the cage.
- Bone should be saved in non-neoplastic or noninfectious cases.
- In cases of malignancy or infection, bone graft substitute should be utilized.
C4
C6-C7
C6
disk
ascending cervical a.
vertebral a.
carotid
sheath
• A plate can then secure the cage and graft in place.
- Posterior supplementation should be considered in cases of poor bone qual-
ity or in multilevel corpectomies.
26
II Cervical
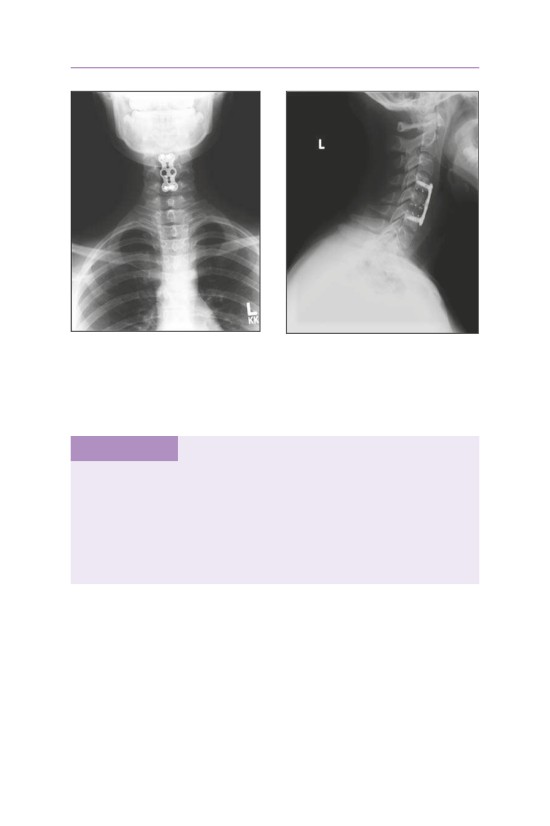
• The patient suffered a traumatic C5 burst fracture with neurological deficit.
• An AP/lateral radiograph demonstrating C5 corpectomy (PEEK cage) with an
anterior cervical plate extending from C4 to C6.
Potential Pitfalls
• Iatrogenic injury to the vertebral artery can occur either because of an aberrant
vertebral artery or from excessive lateral decompression.
• Dural tear, spinal fluid leak, or neurologic injury can occur during resection of
the posterior vertebral body and the posterior longitudinal ligament.
• Graft extrusion and hardware failure can occur in cases of prior posterior de-
compressive procedures or multilevel corpectomy; a posterior stabilizing proce-
dure with instrumentation may be necessary to protect the anterior construct
adequately.
5 Open Posterior Cervical Foraminotomy
Tips and Pearls Before You Begin
Intraoperative imaging is mandatory to confirm the correct level of decompres-
sion. The use of anatomic landmarks can be helpful in many cases, but normal
anatomic variants may lead to confusion and ultimately to surgery on the wrong
level. Visualization can be enhanced with an operating microscope or with a com-
bination of loupes and a fiber-optic head light.
spinal
cord
C3
C5 spinous
C6 spinous
process
process
C7
T1
nerve
IAP
roots
deep cervical
artery
• The inferior articular process (IAP) of the cephalad vertebrae is identified.
27
28
II Cervical
spinal
cord
C3
C5 spinous
C6 spinous
process
process
C7
T1
resected IAP
SAP
C5-C6
of C6
nerve root
• Approximately 35% of the medial portion of the IAP is removed to visualize the
superior articular process (SAP) of the caudal vertebrae.
C5
C6
C6 nerve
root
Kerrison rongeur
resecting C6 SAP
• A Kerrison rongeur or burr can be used to resect the SAP, which overlies the
exiting nerve root.
5 Open Posterior Cervical Foraminotomy
29
C3
C4
C5
C6
C7
T1
C6 nerve
root
keyhole
foraminotomy
• A keyhole foraminotomy is created with the nerve root visualized.
6 Minimally Invasive Posterior Cervical
Foraminotomy
C1 (atlas)
C2 (axis)
C3
initial
dilator
C4
C5
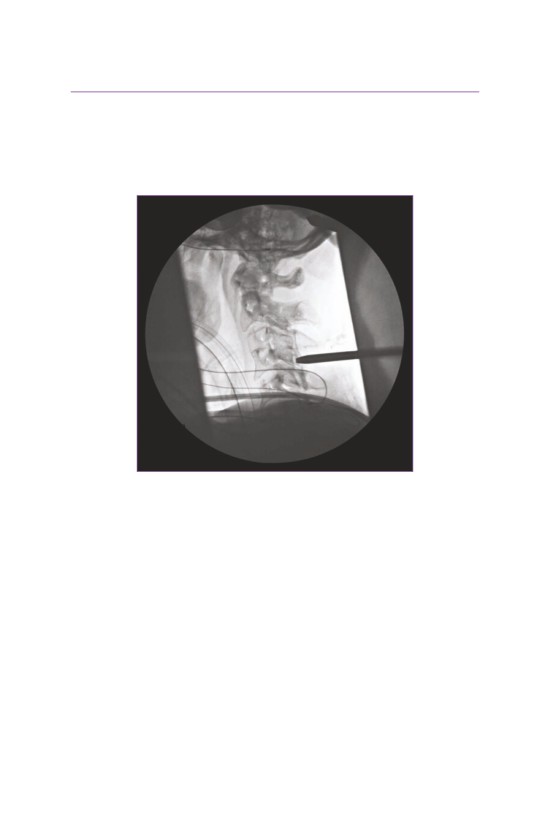
• A lateral fluoroscopic image is used to identify the level in question.
• An incision is made 0.5 cm lateral to the midline.
30
6 Minimally Invasive Posterior Cervical Foraminotomy
31
C1 (atlas)
C2 (axis)
C3
C4
tubular
dilator
C5
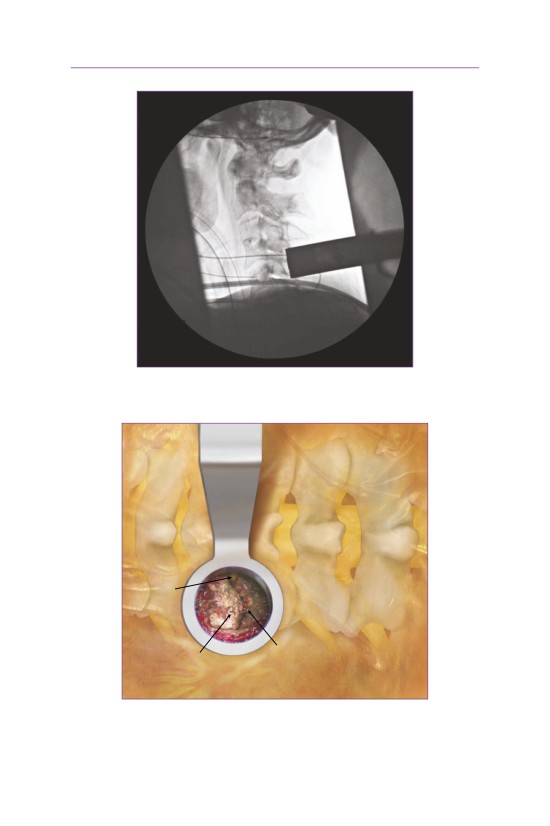
• Tubular dilators (18 mm) are used to spread the paraspinal muscles.
C3
C4
C5
C6
C5 nerve
root
IAP of C4
SAP of C5
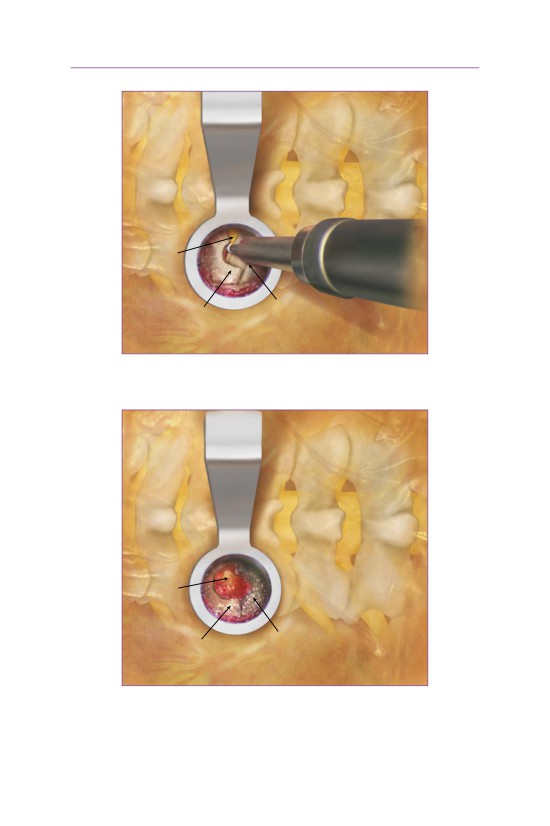
• The soft tissue is removed, exposing the medial half of the facet joint and the
inferior portion of the superior lamina.
32
II Cervical
C3
C4
C5
C6
C5 nerve
root
IAP of C4
SAP of C5
• A burr is used to remove the medial third of the inferior articular process (IAP)
of the cephalad vertebrae.
C3
C4
C5
C6
C5
nerve root
exposed
IAP of C4
SAP of C5
(resected)
(resected)
• The burr is then used to remove the superior articular process of the inferior
vertebrae.
• The nerve root is then visualized exiting into the neuroforamen.
6 Minimally Invasive Posterior Cervical Foraminotomy
33
Potential Pitfalls
• Excessive retraction or compression of the neural elements may lead to
iatrogenic neurologic symptoms. Persistent postoperative symptoms may be
caused by inadequate decompression.
• Excessive resection of the facet joint may result in increased neck pain and,
possibly, spinal instability.
7 Occipitocervical Fusion
Tips and Pearls Before You Begin
For dual plating, occipital screws should be placed three to a side on either side
of the midline, just below the superior nuchal line and as close to the external oc-
cipital protuberance as possible. An independent occipital plate may require only
two or three screws, usually oriented in a vertical or transverse orientation. Leak-
age of cerebrospinal fluid (CSF) at this stage can usually be stopped by placing a
screw or bone wax into the hole.
occiput
dura
C1
C2
C3
C1 lateral
C2 lateral
mass
mass
• Subperiosteal exposure of the occiput and the C1-C2 vertebral levels is essen-
tial for instrumentation placement.
• The vertebral artery travels along the superior lateral surface of the C1 arch
approximately 1.5 cm from the midline.
34
7 Occipitocervical Fusion
35
vertebral artery
occiput
dura
curette
C1
into
C2
C3
foramen
magnum
C2 nerve
root resected
C2 pedicle
lateral
screw start
mass edges
point
• A curette is placed into the foramen magnum to clearly define the inferior bor-
der of the occiput.
occiput
dura
C1
C2
C3
C2 nerve
root resected
lateral
mass edges
• An occipital plate has been applied. Screws are placed bicortically in the
midline.
- The plate is appropriately sized so that it is easier to connect the occipital
and C1-C2 screw tulips.
36
II Cervical
vertebral artery
occiput
dura
C1
C2
C3
C2 nerve
root resected
C2 pedicle
screw start
lateral
point
mass edges
• The C2 (axis) pedicle screw starting point occurs at the inferior and lateral edge
of the inferior articular process of C2.
- The vertebral artery lies directly anterolateral. The screw should be directed
medial and cephalad to avoid potential vascular injury.
▫ Screws placed bicortically into the anterior axis may risk injury to the in-
ternal carotid artery.
▪ The C2 screw is angled 20° medially and 15-20° caudally (use lateral
flouroscopy).
7 Occipitocervical Fusion
37
occiput
dura
C1
C2
C3
C2 nerve
root resected
screw tract
probed
• The screw tract is drilled and then probed to ensure that the cortical walls are
not breached.
occiput
dura
C1
C2
C3
C2 nerve
root resected
C2 screw
inserted
• The C2 pedicle screw is inserted.
38
II Cervical
vertebral artery
occiput
dura
C1
C2
C3
C2 nerve
root resected
C1 lateral
lateral
mass screw
mass edges
start point
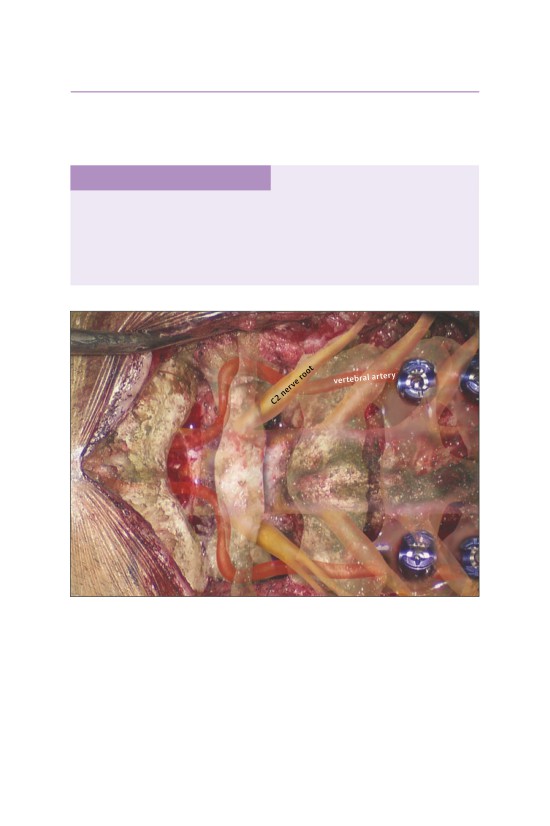
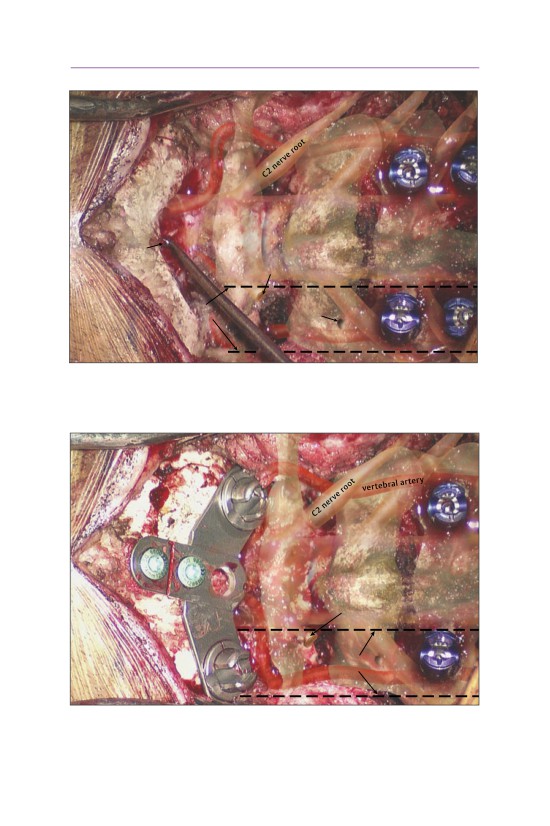
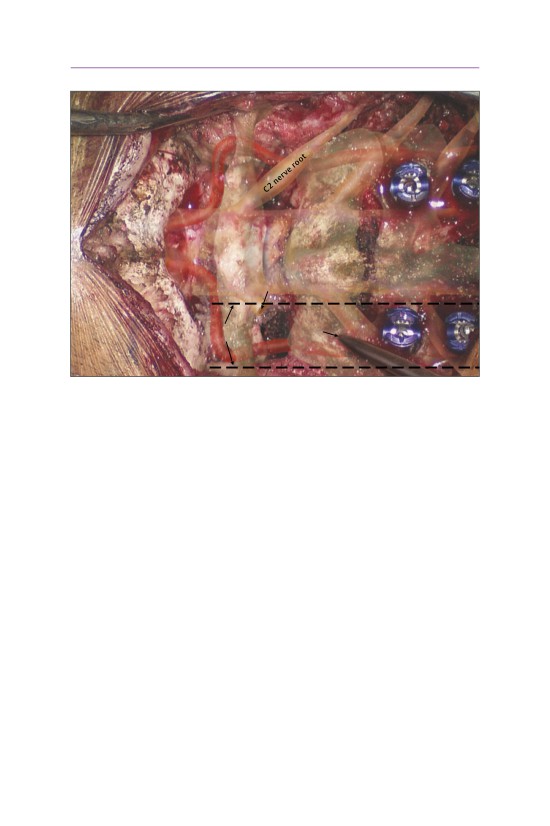
• The C1 (atlas) lateral mass screw starting point is inferior to the arch of C1. The
C2 (occipital) nerve root has been resected to facilitate screw placement.
- Resection of the C2 nerve may result in occipital dythesthesias in up to 20%
of patients.
- The ponticulus posticus (Latin for “little bridge to the rear”) refers to a bony
bridge on the atlas that covers the groove for the vertebral artery (also
known as the arcuate foramen). It is a common anatomic variant that is esti-
mated to occur in 3% to 15% of the population.
7 Occipitocervical Fusion
39
dura
C2
C3
C1
lateral
mass
boundary
vertebral artery
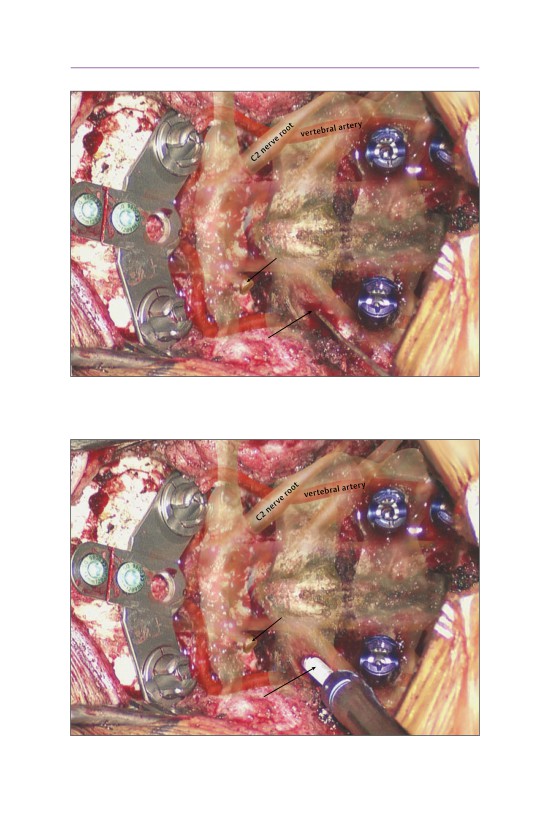
• C1 lateral mass screw placement is shown. Note that the C2 nerve root has
been resected, exposing the C1 lateral mass and C1-C2 facet joint.
dura
C2
C3
C1
lateral
mass
boundary
vertebral artery
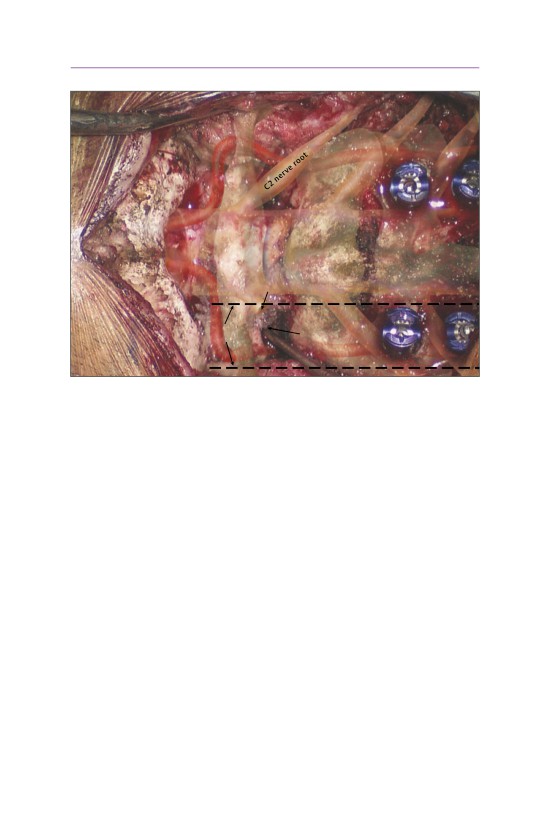
• The C1 screw tract is probed. A unicortical screw is placed. Bicortical screws
are dangerous and may encroach upon the internal carotid artery anteriorly.
- The C1 lateral mass screw is aimed 10° medially and 10° cranially (use lateral
flouroscopy).
40
II Cervical
dura
C1
C2
vertebral artery
• The C1 lateral mass is screw inserted.
Potential Pitfalls
Perpendicular occipital screw placement can be especially difficult due to the
steep angle required close to the foramen magnum. If the occipital bone close
to the foramen magnum is unusually thin or in certain pathologic states, this can
make adequate screw purchase difficult or even impossible. Occipital screw place-
ment at the desired level can be compromised by diseased bone, such as that
found in osteomyelitis or neoplasm. Avoid these problems by placing screws clos-
er to the superior nuchal line, but no more than 20 mm lateral to the midline, and
as far superior to the foramen magnum as feasible. If the desired cervical fusion
levels are too diseased for adequate screw placement, extend the construct infe-
riorly as many levels as necessary. Stabilization must be performed in the neutral
position, as rigid cervical flexion or extension can be extremely distressing to the
patient. Durotomy and neural or vascular injury can occur during drilling, screw
placement, wire passage, or suboccipital craniotomy. A poor fit of the plates or
rods can lead to bony erosion of the lamina or pressure ulcers of the overlying
skin, with subsequent hardware exposure and infection.
8 Posterior Cervical Laminectomy and Fusion
Tips and Pearls Before You Begin
In patients with myeloradiculopathy and significant radicular symptoms, the pres-
ence of foraminal stenosis should be identified on preoperative imaging studies
and appropriate concomitant foraminotomies planned. During preoperative posi-
tioning, excessive flexion or extension should be avoided in myelopathic patients.
For foraminotomies, slight flexion opens the interspaces and foramina, but care
must be taken during dissection, as the dural sac is more susceptible to injury.
The surgical exposure for laminectomy proceeds caudal to cephalad; this facili-
tates subperiosteal detachment of paraspinal muscles, which attach in the same
direction, and reduces bleeding. A clamp is placed on an exposed spinous pro-
cess, and a lateral radiograph is obtained to confirm levels. Dissection should pro-
ceed to the lateral margin of the facet joints. This extent of exposure establishes
the landmarks needed for safe placement of lateral mass screws and ensures that
more than half of the facet joint is not removed during any associated forami-
notomy. Dissection beyond the lateral margin of the facet joint risks significant
bleeding from the soft tissue musculature. Care must be taken to avoid injuring
the facet capsules at any level if a fusion is not planned.
41
42
II Cervical
lateral mass
boundaries
vertebral artery
C5
C6
C7
C3
C4
interspinous
ligament
vertebral artery
lateral mass
boundaries
nerve
roots
• A midline posterior approach is utilized, with dissection performed through the
avascular ligamentum nuchae.
• Subperiosteal exposure is performed, extending out to the lateral edge of the
lateral mass.
- Bleeding is typically encountered along the lateral edge of the lateral mass.
- This bleeding can be controlled with bipolar cautery.
8 Posterior Cervical Laminectomy and Fusion
43
lateral mass
boundaries
vertebral artery
C5
C6
C7
C3
C4
starting
point
vertebral artery
lateral mass
boundaries
nerve
roots
• The lateral mass is exposed and clearly defined, exposing the superior, inferior,
and medial lateral borders.
lateral mass
boundaries
vertebral artery
C4
C5
C6
C3
C7
drill angled
20° cephalad
and lateral
vertebral artery
lateral mass
boundaries
nerve
roots
• Once the lateral mass is defined, the starting point should be created with a
high-speed burr.
- The center of the lateral mass is burred first.
- The drill is then directed 20° cephalad and lateral, thereby avoiding the ver-
tebral artery and nerve root.
44
II Cervical
screw
holes
vertebral a.
C4
C6
C7
C3
troughs
vertebral a.
nerve roots
• Once the lateral mass screw holes are created, a laminectomy can be performed.
- Two troughs are created with a high-speed burr.
- The troughs are created just medial to the screw start points at the junction
of the lateral mass and lamina.
screw holes
vertebral a.
spinal cord
C3
C4
C5
C6
C7
nerve
roots
• The lamina is then removed en bloc with passage of instruments into the canal.
8 Posterior Cervical Laminectomy and Fusion
45
lateral
mass screws
rods
cross
spinal cord
connector
• The lateral mass screws are then placed and rods are secured in place. A cross
connector can be applied to increase torsional rigidity.
- The bone graft is placed into the decorticated facet joints.
Potential Pitfalls
A laminectomy accomplishes indirect decompression of the spinal cord by allow-
ing posterior translation of the cord away from the anterior compressive path-
ology. Typically, a minimum of three or four levels is required to allow adequate
cord translation. When a laminectomy is performed for cervical stenosis, instru-
ments with larger profiles than the footplate of a 2 mm Kerrison rongeur should
not be placed underneath the lamina near the central canal, to minimize the risk
of iatrogenic cord injury. Postsurgical C5 palsy occurs in 0.5% of patients and typi-
cally appears between the second and fifth postoperative day. Most cases sponta-
neously resolve over 6 to 12 months.
Foraminal decompression risks nerve root injury, especially if high-profile Ker-
rison rongeurs are placed into the foramen. Air embolus is a rare complication
associated with posterior cervical surgery when the patient is in the seated po-
sition. Its occurrence can be monitored with the use of end tidal CO2 sensors.
If a significant air embolism is suspected, the patient should undergo immedi-
ate electrocauterization of any readily accessible bleeding veins, and the wound
should be quickly covered. If a central venous catheter was placed preoperatively,
the line can be advanced into the right atrium to attempt evacuation of the air.
If this fails, the patient can be placed in the left lateral decubitus position to trap
the air in the right atrium.
9 Posterior Cervical Laminaplasty with
Instrumentation
Tips and Pearls Before You Begin
Incise the nuchal ligament and paracervical muscles at the exact midline, and
strip the muscles subperiosteally to avoid bleeding. Be careful not to strip or
expose the cervical facet capsules. Complete the hinge side gutter last, after
completion of the open side gutter and the resection of the ligamenta flava at
both ends of the laminar door. Check the stability of the hinge frequently while
making the hinge gutter. Preserve the spinous process of C7 whenever possible
to reduce postoperative axial symptoms. Encourage early active range of motion
of the neck.
facet
capsules
vertebral a.
C3
C4
C5
C6
C7
nerve
roots
• A midline posterior cervical exposure is performed.
• Care is taken not to strip the facet capsule.
• Only the medial portion of the lamina/facet junction is exposed.
46
9 Posterior Cervical Laminaplasty with Instrumentation
47
facet
joint
C5
C6
C4
C7
C3 spinous
process removed
vertebral
artery
nerve
roots
• Once exposed, the spinous processes from C3-C7 are removed.
facet
joint
epidural veins
C4
C5
C3
C6
C7
T1
vertebral
hemostatic
artery
sealant
nerve
roots
• Once the spinous processes are removed, bone wax or a hemostatic sealant is
applied to control bone bleeding.
• The junction between the lamina and facet is identified.
48
II Cervical
epidural veins
C7
T1
C3
C4
C5
C6
vertebral a.
dura mater
3 mm trough created at
laminar/facet junction
nerve roots
• A burr is used to create an opening of approximately 3 mm.
• This opening requires the removal of 15% of the facet joint.
C7
C3
C4
C5
C6
vertebral
artery
dura mater
epidural
vein exposed
• Once the opening is through the lamina, the epidural veins overlying the dura
are visualized.
• A curved microcurette can be used to palpate the defect to ensure that the
trough is through the bone.
9 Posterior Cervical Laminaplasty with Instrumentation
49
unicortical
trough
C7
C3
C4
C5
C6
spinal
cord
epidural veins
facet joint
nerve
roots
• Once the first trough is complete, a similar trough is created on the other side
(hinge side).
• However, the hinge side trough is only unicortical.
unicortical trough
acts as “hinge”
lamina opened
to decompress
spinal cord
C6
C7
C5
C3
C4
vertebral a.
epidural veins
nerve
roots
• A straight curette allows the lamina to be gently opened like a door.
• The spinal cord is then gently decompressed and allowed to float back dorsally
once the lamina are opened.
• Small 10-14 mm craniofacial plates are applied on the opening side.
50
II Cervical
1 screw into lamina;
2 screws into facet
• The plates are secured with 5 mm screws.
- Two are fastened into the lateral mass.
- One is fastened into the lamina.
• The plate secures the lamina in an expanded state, decompressing the spinal
cord.
Potential Pitfalls
• Detachment of the hinge may occur due to excessive burring. Fracture of the
hinge may occur due to inadequate burring and excessive opening force.
• Segmental motor paralysis, particularly at the C5 and C6 segments, occurs in
approximately 0.5% of patients.
• Postoperative axial neck pain and limited cervical range of motion may be re-
lated to excessive stripping of the paraspinal muscle off the facet capsules.
• Closure of the opened laminae may occur with inadequate fixation.
10 Percutaneous Cement Augmentation
Tips and Pearls Before You Begin
The use of biplanar fluoroscopy greatly aids in cannula insertion and cement injec-
tion. The lateral image is brought over the top or under the bed, with the arc lean-
ing away toward the head. The anteroposterior (AP) image is brought in diago-
nally, with the image intensifier directly over the target site. It is most convenient
to obtain the true AP image first, because the diagonal entry makes this process
challenging. The lateral image is then adjusted around the AP image.
Treatment of multiple levels can be performed with a single batch of cement.
The cement is stored in a sterile ice water bath to slow the polymerization pro-
cess. With vertebroplasty, all the cannulas are inserted first, and then each site
is injected sequentially. With kyphoplasty, the first site is drilled, the balloon
tamp deployed, and the cement injected. The limit on the number of levels is
dictated by the cement load. The risk of cement toxicity increases with the num-
ber of levels treated. As a general rule, no more than three levels are treated in
one operation.
Special consideration related to cement fill is needed for kyphoplasty. Along
with the cement required for filling the void created by the balloon tamp, addi-
tional cement is needed to allow integration of the cement into the surrounding
trabecular bone. This serves to lock in the cement. Inadequate filling may lead to
further collapse of the surrounding bone from excessive motion at the interface
between the bone and cement. In general, the volume of cement injected should
be greater than the volume of the inflated balloon.
Maintenance of the reduction via kyphoplasty may be difficult in certain frac-
tures, particularly in vertebrae plana. Once the balloon is deflated, the fracture
may collapse again. The reduction can be maintained by the eggshell technique.
A small amount of cement (0.5 to 1 cc) is injected into the cavity. The balloon
tamp is reinserted and gently reelevated. The small cement bolus is then spread
around the balloon to create a thin eggshell of cement. When the balloon is re-
moved, the eggshell mantle holds the reduction until the remainder of the ce-
ment is injected.
53
54
III Thoracic Spine
AP c - arm
lateral
c-arm
head
foot
• Biplanar fluoroscopy is used throughout the procedure.
10 Percutaneous Cement Augmentation
55
L1 vertebral
body
L2 vertebral
body
L3 vertebral
body
cannulas placed into
L3 vertebral body
• The starting position for the cannula should be at the 10 o’clock or 2 o’clock posi-
tion of the pedicle (superior-lateral corner depending upon the left or right side of
the spine). This position places the cannula the farthest from the exiting nerve root.
The cannula is advanced such that on the AP side it never crosses the medial edge
of the pedicle until it crosses the posterior verterbral body line on the lateral image.
L2
cannula enters
vertebral body
through pedicle
facet
joint
L3 transverse
process
L3
pedicle
L3 body
• The cannula is started lateral to the facet joint, thereby avoiding any damage
to the facet capsule.
56
III Thoracic Spine
L2
cannulas placed into
L3 vertebral body
posterior
L4
anterior
L5
L1 vertebral
body
L2 vertebral
body
balloons inflated,
restoring L3
vertebral height
• Fluoroscopy is used to confirm that the balloon is in the anterior portion of the
vertebral body, so that no bone can be retropulsed into the spinal canal.
10 Percutaneous Cement Augmentation
57
L2
L3 body
• The balloon is then inflated to create a potential space for cement augmentation.
58
III Thoracic Spine
L2
anterior
cannulas placed
into L3
bone cement
injected into
cavities in
posterior
L4
restored L3
L5
• Cement is then added to the vertebral body under fluoroscopic visualization.
The cement is carefully observed on both the AP and lateral images so that the
borders of the vertebral body are not violated. If cement extravasation is noted,
the procedure is terminated. Cement should be avoided in the posterior aspect
of the vertebral body.
10 Percutaneous Cement Augmentation
59
L1 vertebral
body
L2 vertebral
body
balloons removed, residual
cavities filled with bone cement
• Ideally, cement filling should cross the midline in the AP plane.
Potential Pitfalls
• poor fluoroscopic visualization due to severe osteoporosis
• cement embolization
• cement extravasation into the neuroforamina or spinal canal
• pedicle fracture due to improper cannula insertion
• inadequate cement fill
11 Thoracic Pedicle Screw Placement
Tips and Pearls Before You Begin
Meticulous dissection with exposure of the transverse processes is mandatory.
Facetectomies should be performed at each fusion level, and the cartilage should
be removed. Fluoroscopy or intraoperative radiographs can be used to identify
the pedicle shadow. The most important anatomic landmark is the middle of the
facet, as the pedicle screw start point should always be lateral to this midpoint.
T6
pedicles
T7
ribs
• Meticulous dissection should be performed with the inferior 3-5 mm of the
inferior facet osteotomized. The base of the superior articular process is a key
landmark for entry into the pedicle. The starting point for each thoracic screw
varies. Biomechanically, it is best to place the screws parallel to the superior
end plate. When the procedure is started distal at T12, there is a trend toward
a more medial and cephalad pedicle starting point as one proceeds toward the
midthoracic region (T7-T8). Proximal to this point, the starting point moves
more lateral and caudad as one proceeds to the upper thoracic spine.
60
11 Thoracic Pedicle Screw Placement
61
pedicles
T6
T7
ribs
• A burr may be used to create a pedicle blush by removing only the dorsal cor-
tex in the area of the targeted pedicle entry point.
pedicles
T6
T7
ribs
• Pedicle blush refers to bleeding that arises from the vertebral body into the
pedicle start point.
62
III Thoracic Spine
pedicles
T6
T7
ribs
• With gentle but firm ventral pressure, the gear shift should be easily wiggled
into the pedicle. If any amount of significant resistance is met, the surgeon
should reevaluate the starting point and trajectory of the pedicle. The gear
shift should be advanced approximately 30-35 mm.
pedicles
T6
T7
ribs
• The surgeon then probes the pedicle hole to feel for the medial, lateral, supe-
rior, inferior, and ventral walls of the pedicle. Most pedicle violations occur at the
junction of the pedicle and vertebral body (15-20 mm).
11 Thoracic Pedicle Screw Placement
63
• The screw is then appropriately sized and positioned. Typical screw lengths in
the lower thoracic spine average 40-45 mm, while in the upper thoracic spine
lengths may be as short as 35 mm.
Potential Pitfalls
• Pedicle violation medially or inferiorly may occur and result in nerve root or
spinal cord injury.
• Anterior cortex violation from screws that are too long may result in vascular
or visceral injury.
• Pedicle screw pullout or failure of fixation may occur with malpositioned ped-
icle screws.
12 Minimally Invasive Thoracic Corpectomy
Tips and Pearls Before You Begin
Care should be taken to obtain orthogonal fluoroscopic views of the involved ver-
tebral level. Parallax may result in exposure of the incorrect verterbal body and
improper dilator placement along the anterior vertebral body, risking damage
to the great vessels. Blunt dissection is necessary to prevent perforation of the
pleura. A sponge stick or peanut can be used to sweep the pleura anteriorly. If the
pleura is violated, then a chest tube or red rubber catheter can be placed upon
completion of surgery. In general, most patients are asymptomatic, and prompt
removal of the catheter will allow rapid mobilization.
intercostal nerves
T7
T11
T10-
T8
T9-
T11
T12
T10
disk
disk
T9
T10
lung
spinous processes
• Rib exposure. The anterior and posterior margins of the vertebral body to be
resected are marked using fluoroscopy. The overlying rib is subperiosteally
exposed.
64
12 Minimally Invasive Thoracic Corpectomy
65
intercostal nerves
rib released of
neurovascular
bundle
T7
T11
T10-
T8
T9-
T11
T12
T10
disk
T9
disk
T10
lung
spinous processes
• The inferior portion of the rib is subperiosteally released from the neurovascu-
lar bundle.
intercostal nerves
cut edge
of 10th rib
T11
T10-
T8
T11
T9-
lung
disk
T10
T9
disk
T12
T10
spinous processes
• Approximately two centimeters of rib have been resected. The pleura of the
lung is visualized.
66
III Thoracic Spine
lung
retracted
anteriorly
intercostal
nerves
T9
T10
T11
T12
L1
junction of
10th rib and
T10 transverse
process
• A series of tubular dilators are placed into the defect, sweeping the lung and
pleura anteriorly and resulting in an extrapleural exposure of the vertebral
body.
12 Minimally Invasive Thoracic Corpectomy
67
vena cava
T9
T9-
T10-
T10
T11
disk
disk
T10
lung
10th rib
(resected)
intercostal
nerves
• The intervertebral disk space above and below the involved vertebral level is sub-
periosteally exposed. The segmental artery has been cauterized and resected.
vena cava
10th rib
(cut)
anterior
wall of T10
T11
T9
PLL
spinal canal
10th rib
(cut)
intercostal nerves
• The corpectomy has been completed using a high speed burr. The anterior
vertebral body wall has been thinned and preserved while the T9-T10 and
T10-T11 disk spaces have been resected. The spinal canal has been exposed,
preserving the posterior longitudinal ligament.
68
III Thoracic Spine
vena cava
10th rib
(cut)
anterior
wall of T10
plate
plate
on T9
on T11
spinal canal
10th rib
(cut)
intercostal nerves
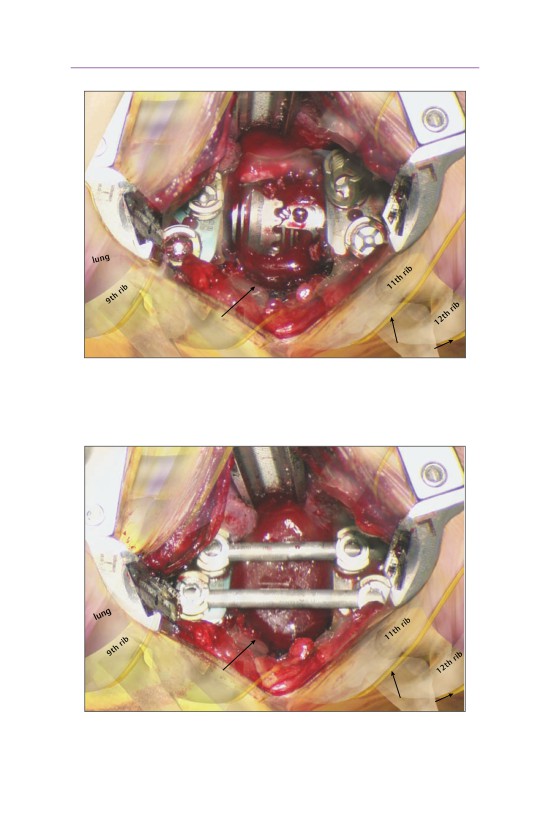
• An expandable titanium cage has been appropriately sized and placed into the
defect. A plate has been placed into the vertebral body above and below at the
T9 and T11 levels, respectively.
vena cava
10th rib
(cut)
10th rib
(cut)
intercostal nerves
• A dual rod construct has secured the T9 and T11 levels.
12 Minimally Invasive Thoracic Corpectomy
69
Potential Pitfalls
Adequate radiographic visualization is important. Improper docking of the dilator
too far anteriorly may result in resection of the anterior longitudinal ligament
with potential implant migration or damage to the great vessels. The segmental
vessel can typically be cauterized. In situations where it continues to bleed, hemo-
static agents and pressure will cause the bleeding to cease.
13 Open Laminectomy and Diskectomy
Tips and Pearls Before You Begin
The ligamentum flavum is often hypertrophied as part of the pathologic process.
In the hypertrophied state, it can become a visual barrier to precise identification
of anatomic structures and may pose a physical impediment to safe entry into the
spinal canal. To obviate these problems, excise the superficial layers of the liga-
mentum separately. A plane of dissection can be found at the lower attachment
of the ligamentum to the top surface of the inferior lamina. The primary connec-
tion of the ligamentum is fixed to the leading surface of the inferior lamina. A
hypertrophied ligamentum will generally expand posteriorly and mushroom up
over the posterior, flat face of the lamina. Careful dissection with a small 2-0 or
3-0 curette, with the blunt aspect against the flat of the inferior lamina, usually
defines the superficial layer for removal. The remaining deep ligamentum can
then be excised. Always release the attachment of the deep layer from the under-
surface of the superior lamina first (with the ligamentum still under tension). A
small curette is used to sweep under the lamina. This minimizes the risk of dural
tear. Releasing the inferior attachment first would slacken the ligament and re-
quire blind grasping under the superior lamina to remove the upper ligamentum.
Blind use of a rongeur increases the risk of dural tears.
If the interlaminar space requires enlargement, this is best done with a side-
cutting burr. To prevent dural compromise, keep the angle of the burr perpendic-
ular to the dura so the noncutting tip is adjacent to vital structures. A horizontal
sweeping motion is used, and an inward push is avoided. Take care to preserve
the pars interarticularis (7-9 mm minimum). Bites from a Kerrison rongeur may
produce stress fractures in the pars.
73
74
IV Lumbar Spine
■ Skin Incision
supraspinous
ligament
L5 spinous
L4 spinous
L3 spinous
process
process
process
dura
traversing L5
L5 lamina
nerve root over
disk herniation
L3-L4 facet
L4-L5 facet
joint
L5-S1 facet
joint
joint
exiting nerve
roots
• A midline incision is used over the levels that are to be resected.
supraspinous
ligament
L4 spinous
L3 spinous
L5 spinous
process
process
process
dura
traversing L4
nerve root
L3-L4 facet
L4-L5 facet
joint
L5-S1 facet
joint
joint
exiting nerve
roots
• The fascia is clearly identified prior to incision.
13 Open Laminectomy and Diskectomy
75
supraspinous
ligament
L4 spinous
L5 spinous
L3 spinous
process
process
process
dura
L3-L4 facet
joint
L5-S1 facet
joint
exiting nerve
roots
• The fascia is then identified and opened in the midline over the spinous pro-
cess. Subperiosteal dissection is accomplished with a Cobb elevator.
L5-S1 facet
joint
L3-L4 facet
joint
supraspinous
ligament
L5 spinous
L4 spinous
L3 spinous
S1
process
process
process
L5
dura
L4
lamina
lamina
L5-S1
traversing L5
disk space
nerve root over
disk herniation
L3-L4
disk space
• The laminae are exposed to the medial edge of the facet capsule.
76
IV Lumbar Spine
L5-S1 facet
joint
L4-L5 facet
joint
L3-L4 facet
joint
L5 spinous
process
traversing L5
nerve root over
disk herniation
• The inferior half of the L4 and superior half of the L5 spinous processes are
removed along with the supraspinous and interspinous ligaments.
L5-S1 facet
joint
L4-L5 facet
joint
L3-L4 facet
joint
inferior half
L5
L4
lamina
superior half
of L5 spinous
lamina
of L4 spinous
process
ligamentum
process
flavum
S1
traversing L5
nerve root over
L3-L4
disk herniation
disk space
• A Kerrison rongeur is used to remove the ligamentum flavum.
13 Open Laminectomy and Diskectomy
77
L5-S1 facet
joint
L4-L5 facet
joint
L3-L4 facet
joint
L5
L4
inferior remnant
superior remnant
lamina
lamina
of L5 spinous
of L4 spinous
process
process
dura
S1
L3 spinous
process
L3-L4
disk space
• The lateral recess is decompressed by undercutting the superior articular pro-
cess of the inferior vertebra.
L5-S1 facet
L4-L5 facet
joint
joint
L3-L4 facet
joint
inferior remnant
L5
L4
superior remnant
of L5 spinous
lamina
lamina
of L4 spinous
process
process
dura
S1
traversing L5
nerve root
disk
herniation
• The traversing nerve root is gently retracted medially exposing the underlying
disk herniation. The dura and the traversing nerve root are exposed.
78
IV Lumbar Spine
L5-S1 facet
joint
L4-L5 facet
joint
L3-L4 facet
joint
L5
inferior half
lamina
superior half
of L5 spinous
of L4 spinous
process
process
L3 spinous
dura
S1
process
traversing L5
nerve root
retracted medially
disk
herniation
• A knife is used to make an annulotomy over the disk herniation.
L5-S1 facet
joint
L4-L5 facet
joint
L3-L4 facet
joint
L5
inferior half
lamina
superior half
of L5 spinous
of L4 spinous
process
process
dura
L3 spinous
S1
process
traversing L5
nerve root
extracted medially
L3-L4
disk space
L4-L5 disk
disk
space
fragment
• The disk fragment is removed with a pituitary rongeur.
13 Open Laminectomy and Diskectomy
79
Potential Pitfalls
If surgery is performed at the wrong level, it is usually done at the segment above
the intended operation. If there is any question of the expected pathology not
being found, additional confirmatory imaging should be performed to establish
levels prior to incising the annulus.
14 Open Posterolateral Lumbar Fusion
Tips and Pearls Before You Begin
In the lumbar spine, the pedicles are medially oriented, particularly in the lower
lumbar segments. A lateral fluoroscopic image obtained for purposes of local-
ization is extremely helpful in determining cephalad/caudad orientation of the
pedicle. In general, the L3 pedicle is directed straight vertically toward the floor,
with the upper lumbar segments angulated toward the head and the lower lum-
bar levels directed toward the foot. If a pedicle cannot be cannulated, a hemilami-
notomy can be performed, palpating the medial wall to determine angulation.
L3 spinous
L4 spinous
L5 spinous
process
process
process
L4 pedicle
• The initial exposure should involve subperiosteal dissection of the muscle to
the facet joint.
80
14 Open Posterolateral Lumbar Fusion
81
L4 spinous
L3 spinous
process
process
L4
pedicle
L4-L5 facet
joint
transverse
process
• Resection of the facet capsule and exposure of the superior articular process
(caudad vertebra) and the transverse process is essential to identify the start-
ing point for the lumbar pedicle screw.
L4 spinous
L3 spinous
process
process
mamillary
process
transverse
process
L4
L4-L5 facet
pedicle
joint
• Pedicle start point. The transverse process is bisected, and the mamillary pro-
cess is identified at the junction of the inferolateral corner of the facet joint.
82
IV Lumbar Spine
L4 spinous
L3 spinous
process
process
lateral edge
of pars inter-
articularis
L4
L4-L5 facet
pedicle
joint
transverse
process
• The pars interarticularis is used to identify the medial extent of the pedicle.
L4 spinous
L3 spinous
process
process
L4
L4-L5 facet
pedicle
joint
transverse
process
• The gear shift is advanced with gentle pressure and slight medial angulation.
14 Open Posterolateral Lumbar Fusion
83
L4 spinous
L3 spinous
process
process
L4
L4-L5 facet
pedicle
joint
transverse
process
• The four walls of the pedicle are probed.
L4 spinous
L3 spinous
process
process
L4
L4-L5 facet
pedicle
joint
transverse
process
• The pedicle tract is tapped.
84
IV Lumbar Spine
L4 spinous
L3 spinous
process
process
L4-L5 facet
joint
transverse
process
• The pedicle screw is placed.
Potential Pitfalls
During exposure, bleeding typically occurs along the lateral aspect of the facet
joint and the lateral edge of the pars interarticularis. These segmental arteries
should be prophylactically cauterized with bipolar cautery; otherwise, undue
time is spent obtaining hemostasis. Pedicle wall violations typically occur at the
pedicle-vertebral body junction (15-20 mm in depth). If a violation occurs, the
starting point of the screw can be lateralized and the angulation of the screw can
be adjusted.
15 Minimally Invasive Lumbar Exposure
Tips and Pearls Before You Begin
Radiographic visualization is extremely important both in the anteroposterior
(AP) and lateral views. Often, the initial dilator can be used as a Cobb elevator,
with gentle subperiosteal dissection being performed to sweep the paraspinal
muscle off the lamina. Anatomic landmarks may be difficult to conceptualize as
the surgeon adapts to the minimally invasive technique.
spinous
processes
midline
L5 traversing
nerve root
L5
L4
lamina
lamina
L5 exiting
nerve root
L5 pedicle
L3
L4 pedicle
L4-L5
disk space
L3 exiting
L4 exiting
nerve root
nerve root
• By use of an AP fluoroscopic image, key bony landmarks are identified:
- midline (spinous processes)
- pedicular line (lateral edge of the pedicle)
▫ vertical
▫ horizontal
- skin incision line
▫ For laminectomies, the incision is made closer to the midline.
▫ For fusions, the incision is made lateral to the midpedicular line (1.0 cm).
- The size of the skin incision is dependent upon the size of the final working
portal (15-26 mm).
85
86
IV Lumbar Spine
midline
traversing L5 root
erector spinae muscle
under L4 lamina
L5
L4 pedicle
targeted
lamina
L4-L5 facet
joint
L5 exiting
nerve root
L4
L3
L5 pedicle
L4-L5
L4 exiting
disk space
nerve root
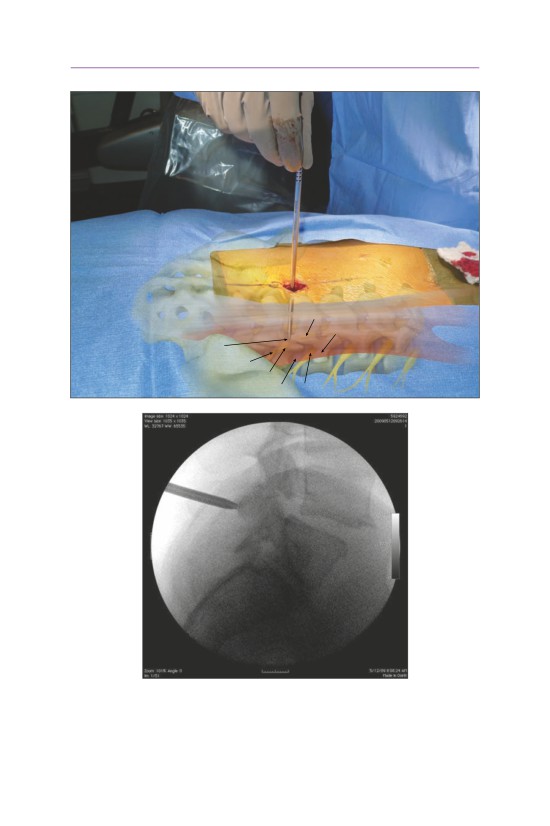
• An initial dilator is used to localize the disk space to be prepared using a lateral
fluoroscopic image.
15 Minimally Invasive Lumbar Exposure
87
midline
targeted L4-L5
traversing L5 root
facet joint
under L4 lamina
erector spinae muscle
L4 pedicle
L5
lamina
exiting L5
nerve root
exiting L4
L3
L5 pedicle
nerve root
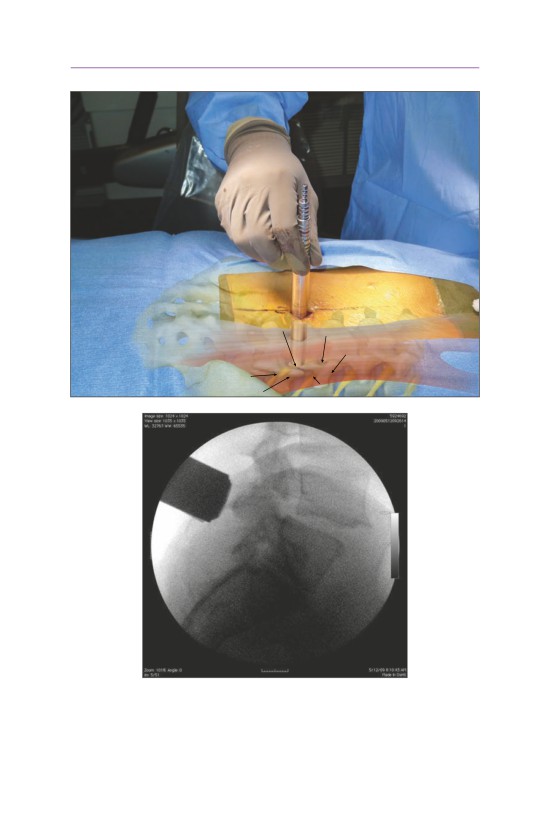
• The dilators are sequentially increased in size, thereby increasing the size of the
working portal.
- The dilators should be gently swept to remove any intervening muscle and
soft tissue.
88
IV Lumbar Spine
midline
tube retractor
traversing L5 root
over L4-L5 facet
under L4 lamina
L5
L4 pedicle
lamina
exiting L5
nerve root
L3
L5 pedicle
L4
exiting L4
nerve root
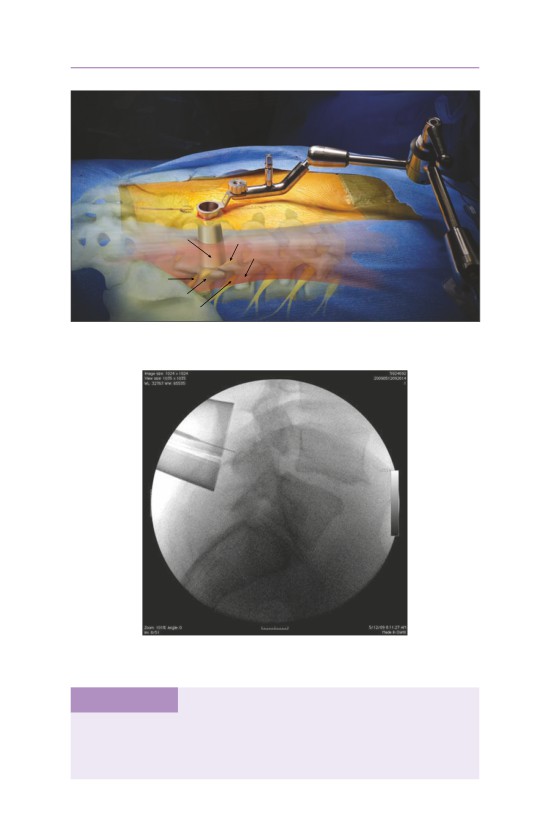
• The final portal is established and firmly connected to the surgical bed.
• A lateral fluoroscopic image is obtained to confirm localization of the disk
space to be prepared.
Potential Pitfalls
Inadequate or incorrect retractor placement will lead to incomplete decompres-
sion and fusion procedures. Radiographic visualization can help confirm and ori-
ent the surgeon when visualization of the anatomy is difficult due to bleeding or
incorrect positioning of the retractor.
16 Minimally Invasive Laminectomy
Tips and Pearls Before You Begin
Proper patient positioning and good intraoperative imaging are essential. For the
given procedure, it is also important to choose the correct size for the retractor. For
a decompression, a smaller diameter retractor is required to allow placement medial
to the facet joint. Once the retractor is in the correct position, resist the tempta-
tion to move it often because such movement leads to creep of the muscle into the
wound.
If there is an incidental durotomy, it should be treated in a similar fashion to the
same complication encountered in an open procedure. A primary suture repair is
preferable if it is possible.
Epidural bleeding needs to be proactively controlled. There are several ways to
reduce the likelihood of problematic bleeding. First, positioning of the patient on the
Jackson frame reduces intra-abdominal pressure. When in the epidural space, find the
bleeders before they find you and use bipolar electrocautery. Liberally use a throm-
botic paste product to minimize bleeding.
midline
L5 spinous
process
L5-S1
disk
space
L4 lamina
L5
pars inter-
lamina
articularis
L5 pedicle
L3-L4
L4-L5 facet
facet joint
L5-S1 facet
joint
joint
L3-L4
disk
space
L4-L5 disk
L4 pedicle
space
• Exposure of the hemilamina.
89
90
IV Lumbar Spine
midline
L5 spinous
process
L5-S1
disk
space
L4 lamina
L5
lamina
L5 pedicle
L3-L4
facet joint
L4-L5 facet
L5-S1 facet
joint
L3-L4
joint
disk
space
L4-L5 disk
L4 pedicle
space
• The high-speed burr is used to remove the lamina.
L5 spinous
midline
process
L4
lamina
L5-S1
disk
ligamentum
space
flavum
L5
lamina
L5 pedicle
L3-L4
facet joint
L4-L5 facet
L5-S1 facet
joint
joint
L3-L4
disk
space
L4 pedicle
• Detachment of the ligamentum flavum from the superior L4 lamina.
16 Minimally Invasive Laminectomy
91
contralateral
L5-S1 facet joint
L3 spinous
L4 spinous
superficial
process
L5 spinous
process
midline
process
L4
dura
lamina
deep midline
L5
lamina
L3-L4
facet joint
L4-L5 facet
L4 pedicle
L5-S1 facet
L5 pedicle
joint
joint
• Undercutting the ipsalateral L4-L5 facet joint.
contralateral
contralateral
L5-S1 facet joint
L5 pedicle
L3 spinous
process
L4 spinous
superficial
L5 spinous
process
midline
process
deep midline
dura
L4
L5
lamina
lamina
L3-L4
facet joint
L4 pedicle
L4-L5 facet
L5-S1 facet
joint
L5 pedicle
joint
• Palpation of the contralateral pedicle and lateral recess.
92
IV Lumbar Spine
contralateral
L5-S1 facet joint
contralateral
L5 root
L3 spinous
superficial
process
L5 spinous
midline
process
deep midline
dura
L4
L5
lamina
lamina
L3-L4
facet joint
L4 pedicle
L4-L5 facet
joint
L5-S1 facet
L5 pedicle
joint
L4-L5 disk
space
• The decompression occurs with the tube directed medially; therefore, the su-
perficial midline is crossed during the decompression.
• A completed laminectomy demonstrates that the thecal sac is completely de-
compressed, with the overlying paraspinal muscle preserved.
Potential Pitfalls
Operative times are typically longer, and increased complications may occur dur-
ing the initial minimally invasive surgical (MIS) experience. It is essential to master
open techniques before you attempt these less invasive options. When you transi-
tion from open to less invasive tubular techniques, it is critical to develop your skill
set in an algorithmic fashion. We suggest soft tissue decompression, followed by
stenosis, and finally, fusion techniques.
17 Minimally Invasive Far Lateral Diskectomy
Tips and Pearls Before You Begin
Far lateral disk herniations affect the nerve root exiting lateral to the neurofora-
men. Therefore, a standard hemilaminotomy will not allow for visualization of the
disk herniation without excessive or complete resection of the facet joint. L5-S1
disk herniations pose an additional anatomic challenge because the sacral ala and
iliac wing will often prevent a far lateral approach.
L4
L5
• Lateral fluoroscopic visualization is essential to confirm the appropriate level.
93
94
IV Lumbar Spine
L3-L4
facet
joint
L4-L5 facet
joint
L5-S1 facet
disk
joint
space
L4
transverse
process
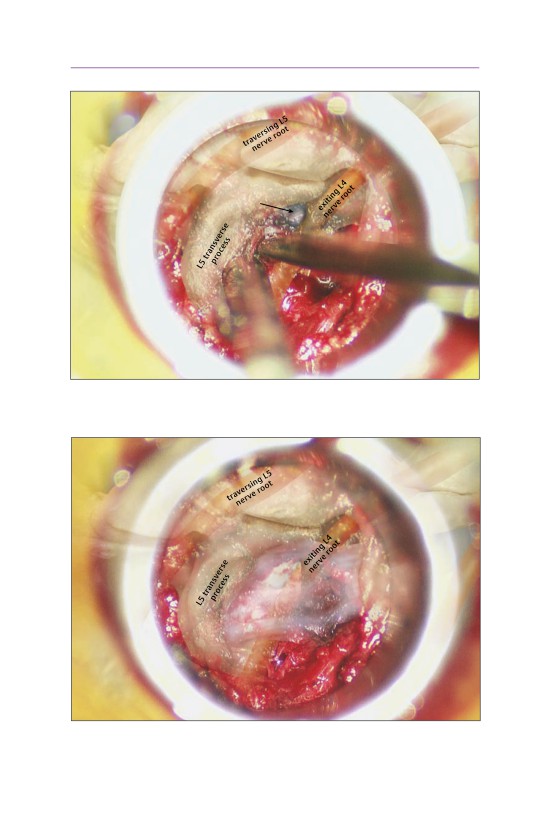
• The incision is typically made 4 cm lateral to the midline. The tube is docked onto
the lateral aspect of the pars interarticularis and the inferior transverse process.
L3-L4
facet
joint
L4-L5 facet
L5-S1 facet
joint
joint
disk
space
L4
transverse
process
intertransverse
septum
• The tube is docked lateral to the L4-L5 facet joint.
17 Minimally Invasive Far Lateral Diskectomy
95
L4-L5 disk
L4-L5 facet
herniation
joint
L5-S1
facet
joint
L4
L5
transverse
transverse
process
process
exiting L4
nerve root
• The intertransverse septum is exposed and is detached from the inferior trans-
verse process with a curved curette.
L4-L5 facet
joint
L5-S1
facet
joint
L4
herniated
transverse
disk
process
L5
ansverse
tr
process
• The nerve root is typically displaced such that it is dorsal and lateral to the disk
herniation.
96
IV Lumbar Spine
L4-L5 facet
joint
L5-S1
facet joint
L4
herniated
transverse
disk
process
space
L5
ansverse
tr
process
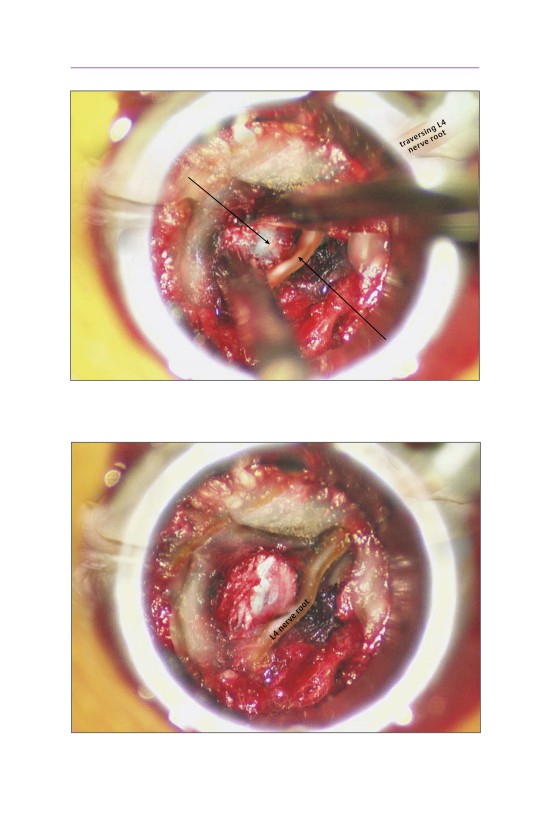
• The nerve root should be gently mobilized superiorly to expose the underlying
disk space.
L4-L5 facet
joint
disk
L5
material
transverse
process
• A pituitary rongeur is used to remove the disk fragments.
17 Minimally Invasive Far Lateral Diskectomy
97
L4-L5
facet joint
L5-S1
facet joint
disk
space
L5
ansverse
tr
process
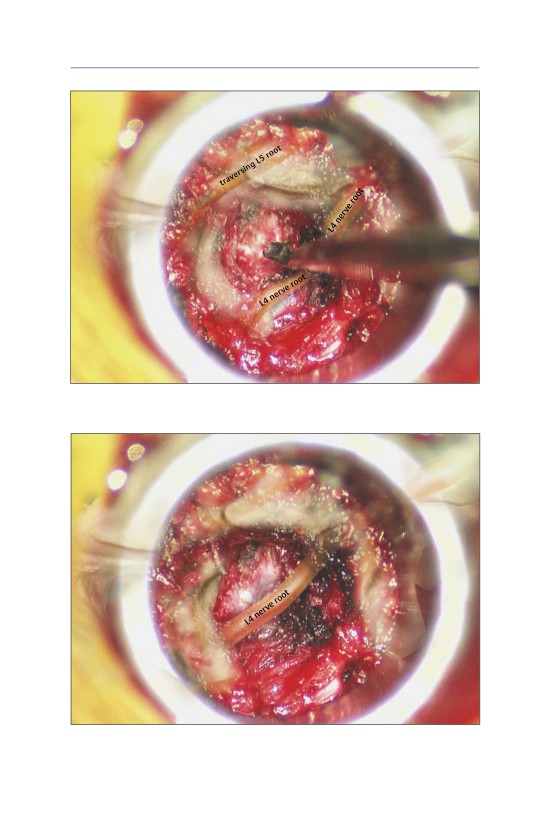
• A curette is placed into the site of the disk herniation.
L4-L5
facet joint
L5-S1
facet joint
disk
L4
space
transverse
process
L5
ansverse
tr
process
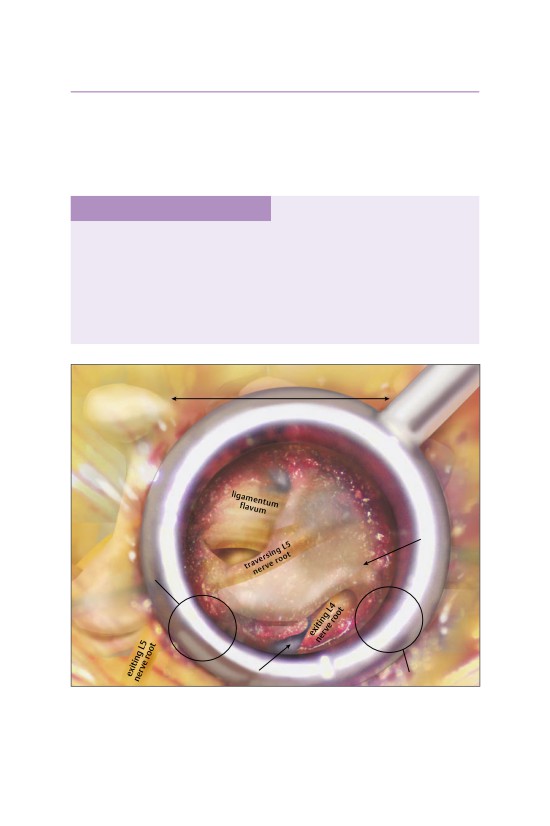
• If there is any foraminal stenosis, a Kerrison rongeur can be passed into the
neuroforaminal space from the outside in, thereby resecting any foraminal or
extraforaminal osteophytes.
98
IV Lumbar Spine
Potential Pitfalls
Meticulous dissection is necessary to obtain hemostasis, particularly when the
intertransverse septum is resected. Bleeding, if not controlled, will result in poor
visualization of the disk herniation, with a resultant inadequate decompression.
18 Minimally Invasive Transforaminal Lumbar
Interbody Fusion
Tips and Pearls Before You Begin
Visualization of the disk space is essential. Complete resection of the facet joint
with removal of all overlying bone from the superior articular process of the in-
ferior vertebra should be performed. Disk space preparation is the key to an in-
creased likelihood of a successful arthrodesis. A combination of currettes and Ker-
rison rongeurs should be used to prepare the end plate. Fluorscopy may be used
to ensure that the anterior longitudinal ligament is not violated. Care should be
taken with paddle distractors and shavers, as these devices may compromise the
end plates, which can result in subsidence of the implant.
midline
L5 spinous
process
dura
L4 lamina
pars inter-
L5
articularis
lamina
L5 pedicle
L4-L5 facet
L5-S1 facet
joint
joint
L4-L5 disk
space
L4 pedicle
• With the working portal appropriately docked on the level of pathology, an
initial exposure can be performed.
• Often there are residual paraspinal muscle fibers that must be removed from
the lamina.
99
100
IV Lumbar Spine
midline
L5 spinous
process
dura
pars inter-
articularis
L5
lamina
L5 pedicle
L4-L5 facet
joint
L5-S1 facet
joint
L4-L5 disk
exiting L4
space
L4 pedicle
nerve root
• Once the lamina is exposed, a high-speed burr is used to perform a laminec-
tomy. Bone is removed until only the flavum is visualized.
- The laminectomy is extended laterally through the pars interarticularis.
- Bone is saved in a bone trap.
18 Minimally Invasive Tranforaminal Lumbar Interbody Fusion
101
midline
L5 spinous
process
dura
L5
lamina
L5 pedicle
L5-S1 facet
joint
L4-L5 disk
space
L4 pedicle
• The laminectomy is extended cranially until the end of the flavum insertion is
identified.
- Epidural fat or dura is often seen.
• This marks the cranial extent of the laminectomy.
• The burr is then directed directly laterally through the pars interarticularis.
102
IV Lumbar Spine
midline
L5 spinous
process
dura
L5
L4
lamina
lamina
L5 pedicle
L5-S1 facet
joint
L5 superior
L4-L5 disk
exiting L4
facet
space
nerve root
• Once the burr is through the pars, the inferior articular process can be removed,
completing the facetectomy and exposing the involved disk space.
midline
L5 spinous
process
dura
ligamentum
flavum
L4
lamina
L5
lamina
L5-S1 facet
joint
L5 superior
L4-L5 disk
exiting L4
facet
space
nerve root
L4 pedicle
• The ligamentum flavum can now be resected.
• Care is taken to preserve the flavum initially, as it protects the dura while the
decompression is being performed.
18 Minimally Invasive Tranforaminal Lumbar Interbody Fusion
103
midline
L5 spinous
process
dura
ligamentum
flavum
L4-L5 disk
space
L5
L4
lamina
lamina
L5 pedicle
L5-S1 facet
joint
L5 superior
exiting L4
facet
nerve root
• Bipolar cautery is used to coagulate the veins that overlie the disk space.
superficial
L5 spinous
midline
process
dura
deep
midline
L4
lamina
L5
lamina
L5 pedicle
L5-S1 facet
joint
L5 superior
cage in
L4-L5 disk
exiting L4
facet
space
nerve root
• Once the veins have been coagulated, the inferior pedicle (L5) and disk space
(L4-L5) can be visualized.
- The traversing nerve root (L5) is just medial to the pedicle.
- The exiting nerve root (L4) is above the disk space. It is not typically exposed.
104
IV Lumbar Spine
• The working space in the TLIF is lateral to the exiting root in the neuroforamen.
- Lateral fluoroscopic imaging is used when preparing the disk space.
18 Minimally Invasive Tranforaminal Lumbar Interbody Fusion
105
• The disk space is prepared using a combination of paddle distractors and end
plate shavers to remove the disk material.
106
IV Lumbar Spine
• Once the disk material has been removed and the end plates prepared, a bone
funnel is passed into the disk space.
- The bone collected during the laminectomy can then be placed into the disk
space.
• The interbody cage is then impacted into place.
- Care is taken to protect the nerve root during cage placement.
18 Minimally Invasive Tranforaminal Lumbar Interbody Fusion
107
dura
deep
midline
L5 traversing
nerve root
suction on TLIF
L4 exiting
working zone
nerve root
• The interbody cage has been placed into the prepared disk space.
- The cage is directed obliquely toward the midline.
- The tube can be directed medially to perform a contralateral decompression.
Potential Pitfalls
Inadequate resection of the facet joint will lead to decreased visualization of the
disk space. As a result, the transforaminal working zone will be narrowed and an
undersized implant will be placed, increasing the likelihood of cage migration and
pseudarthrosis.
19 Mini-Open Pedicle Screw Placement
midline
L5 spinous
process
dura
L4 lamina
pars inter-
articularis
L5
lamina
L4-L5 facet
joint
L5-S1 facet
joint
pedicle
L4-L5 disk
L5 transverse
start
space
L4 pedicle
process
point
■ Step 1: Pedicle Start Point Is Identified
• The pedicle start point is identified through the working portal. This allows for
medial-lateral orientation in the anteroposterior (AP) plane.
108
19 Mini-Open Pedicle Screw Placement
109
• Lateral fluoroscopic imaging is used to confirm the direction in the cephalad-
caudal plane.
• A gear shift is placed through the pedicle start point to the desired depth under
direct lateral fluoroscopy.
110
IV Lumbar Spine
■ Step 2: Pedicle Is Cannulated
• The pedicle tract is probed.
19 Mini-Open Pedicle Screw Placement
111
• Pedicle screws are then placed.
• These same steps are repeated for the adjacent level.
112
IV Lumbar Spine
• A rod is then placed and secured through the tube.
L5 spinous
process
thecal sac
L4 lamina
L4 pedicle
L5 pedicle
L3-L4 facet
joint
L5-S1 facet
joint
rod
L4 pedicle
set screw
L5 pedicle
set screw
cage in L4-L5
exiting L4
disk space
nerve root
• Intraoperative view.
20 Percutaneous Pedicle Screw Placement
2 o’clock
pedicles
end plate
spinous
process
• The end plate is clearly visualized. The spinous process is centered between
both pedicles. The Jamshidi needle is started at the 2 o’clock position.
113
114
IV Lumbar Spine
pedicles
spinous
process
• The Jamshidi trocar is advanced 15 mm until it is centered in the pedicle.
20 Percutaneous Pedicle Screw Placement
115
medial
edge of
pedicle
• A guide wire is then advanced an additional 10 mm until it abuts the medial
wall of the pedicle on the AP image.
116
IV Lumbar Spine
medial
wall of
●
pedicle
guide wire
in adjacent
level
●
spinous
processes
end plate
●
●
• The steps are repeated for the adjacent level. End plate visualization and cen-
tering the spinous process are essential steps for ensuring accurate percutane-
ous screw placement.
20 Percutaneous Pedicle Screw Placement
117
●
●
pedicles
spinous
processes
●
●
• Guide wires have been placed into both pedicles on the AP view.
118
IV Lumbar Spine
posterior
vertebral
wall
• A lateral image is then obtained to confirm that the guide wires are past the
vertebral body wall. This image is extremely important, as it confirms that the
guide wire has not breached the medial wall of the pedicle before entrance into
the vertebral body. A cannula is then placed in between the guide wires.
20 Percutaneous Pedicle Screw Placement
119
pars inter-
articularis
disk
spaces
• The working dilator is docked over the pars interarticularis and disk space level.
• The disk space is prepared as previously described.
120
IV Lumbar Spine
inter-
vertebral
cage
• The pedicles are tapped over the guide wire.
20 Percutaneous Pedicle Screw Placement
121
cannulated
pedicle screw
(over guide wire)
inter-
vertebral
cage
cannulated
pedicle screw
(guide wire
removed)
• Cannulated pedicle screws are placed over the guide wire.
122
IV Lumbar Spine
cannulated
pedicle screws
rod
inter-
vertebral
cage
• The rod is passed submuscularly into the tulips of the pedicle screws after the
guide wires are removed. Gentle compression can be applied to the graft.
20 Percutaneous Pedicle Screw Placement
123
midline
(spinous
processes)
pedicle
rod
screws
intervertebral
cage
• Final AP image, demonstrating centered cage placement and gently converg-
ing pedicle screws.
21 Extreme (eXtreme) Lateral Interbody Fusion
Tips and Pearls Before You Begin
A good fluoroscopic image is extremely helpful. Adjust the cephalocaudal angle
of the C -arm to provide a clear lateral view of the end plates. There is a tendency
to cheat the initial exposure anteriorly to avoid the nerves posteriorly. However,
because the retractor is designed to prevent pressure on the posterior elements,
the aperture is preferentially expanded anteriorly. Therefore, the ideal initial tar-
get spot is the direct center of the lateral aspect of the disk, which will result in
retractor exposure of the anterior half of the disk space. Multilevel procedures
can be performed with the same skin incision but separate fascial incisions and
psoas muscle dilations. In degenerative scoliosis cases, coronal alignment can be
achieved from either side, but access is easier from the concave side, which allows
access to multiple levels through the same incision. The contralateral annulus
must be disrupted to achieve parallel distraction, optimal biomechanical position
of the implant, and optimal coronal alignment.
124
21 Extreme (eXtreme) Lateral Interbody Fusion
125
lateral femoral
cutaneous n. (L2-L3)
L3-
L3
L4-
L4
L4
L5
disk
L5
disk
psoas muscle
femoral n.
iliohypogastric n.
ilioinguinal n.
(L1)
• The patient is placed into a direct lateral position.
• It is essential that the patient be directly perpendicular to the ground to ensure
true anteroposterior (AP) and lateral fluoroscopic views of the disk space.
• AP and lateral fluoroscopic imaging is used to identify the disk space.
iliohypogastric n.
lateral femoral
cutaneous n.
L3-
L3
L4
L4
disk
genitofemoral n.
ilioinguinal n.
lumbosacral
femoral n.
trunk
• A skin incision is made, exposing the fibers of the external oblique muscle.
126
IV Lumbar Spine
iliohypogastric n.
lat. femoral
cutaneous n.
L3-
L3
L4
L4
disk
genitofemoral n.
psoas m.
genitofemoral n.
ilioinguinal n.
• The fibers of the internal oblique muscle lie underneath the external oblique.
- These fibers run in an opposite direction.
lat. femoral
cutaneous n.
L3
L4
genitofemoral n.
L4-
L5
disk
ilioinguinal n.
lumbar
plexus
• Once the fibers of the internal oblique are split, the transversalis fascia is identified.
21 Extreme (eXtreme) Lateral Interbody Fusion
127
lat. femoral
cutaneous n.
L3-
L4
L3
disk
genitofemoral n.
lumbar plexus
lies within the
psoas muscle
psoas m.
iliohypogastric n.
• The transversalis fascia is bluntly opened, exposing the retroperitoneal fat.
vena cava
abdominal aorta
L3
L4
L4-L5
L5
disk
nerve
plexus
• The psoas muscle is then identified. It can be either traversed with continuous
neuromonitoring or swept posteriorly.
• The lumbar plexus lies within the substance of the psoas, so care should be
taken to avoid the lumbar nerve roots, particularly at the L4-L5 level.
• Bipolar cautery is used to expose the disk space, removing any residual overly-
ing fibers of the psoas muscle.
128
IV Lumbar Spine
vena cava
L4
L5
nerve
plexus
• Once the disk space is exposed, an annulotomy can be performed.
- Note that the nerve root is posterior to the posterior retractor blade.
vena cava
abdominal aorta
L4
L5
• The end plate is carefully prepared, with particular attention to avoiding viola-
tion of the vertebral end plates.
• It is essential to prepare the entire end plate across to the contralateral side.
- Releasing the contralateral annulus will greatly improve exposure and allow
for correction of coronal plane deformities.
21 Extreme (eXtreme) Lateral Interbody Fusion
129
vena cava
abdominal aorta
L3
L4
L5
• An intervertebral cage is gently impacted into place.
- The cage should span the entire width of the vertebral body, thereby resting
on the ring apophysis.
▫ This placement will minimize the likelihood of cage subsidence.
- The cage is placed using AP and lateral fluoroscopic imaging.
Potential Pitfalls
Failing to position the patient properly makes for a tedious procedure. A few ex-
tra minutes in the beginning will save a lot of time in the end. Disk removal and
end-plate preparation should be thorough to facilitate fusion and should extend
across the disk space through the contralateral annulus. Failure to release the
contralateral annulus may result in difficulty in implant positioning, leading to
coronal imbalance if the implant is inserted asymmetrically, or in subsidence if a
short implant is chosen. End-plate compromise should be avoided by using care-
ful preparation techniques that spare the end plate. If the height of the implant
is oversized, it may cause rupture of the anterior longitudinal ligament, displace-
ment of the implant anteriorly, or difficulty in distracting adjacent levels in multi-
level procedures.
22 Minimally Invasive Lumbar Corpectomy
Tips and Pearls Before You Begin
The approach for the minimally invasive lumbar corpectomy is similar to that of
the extreme lateral interbody fusion. However, care should be taken to be more
anterior to the psoas muscle, because two disk space levels are treated simulta-
neously, which increases the likelihood of postoperative lumbar nerve root dys-
function. The upper lumbar levels (L1-L3) are much easier to treat because the
psoas is less prominent at these levels and the retractor can be safely positioned
anterior to the psoas. At the L4 vertebral level, the patient should be informed
that there may be a chance for postoperative psoas and lower lumbar nerve root
dysfunction. In the majority of cases, the dysfunction resolves within 2-4 weeks
postoperatively.
genitofemoral n.
segmental
arteries
iliac vein
L4-L5
L3-
and artery
L3 L2-
disk
L4
L4
L3
L2
disk
disk
ascending
lumbar vein
iliohypogastric n.
• Typical lateral positioning of the patient.
130
22 Minimally Invasive Lumbar Corpectomy
131
ALL
L3-
L2-
L4
L3
L3
L2
L4
disk
disk
PLL
psoas muscle
ascending
lumbar vein
• The dilator has been docked over the pathologic vertebral body. The psoas is
retracted posteriorly.
ALL
L2-
L3
L2
disk
L3-
L3
L4
L4
disk
PLL
ascending
lumbar vein
• A high speed burr is used to remove the L3 vertebral body.
132
IV Lumbar Spine
L2
thin anterior
wall of L3
L4
PLL
nerve
roots
ascending
lumbar vein
L2 spinous
process
• The corpectomy is complete. The L2-L3 and L3-L4 disk spaces have been re-
sected. The L3 vertebral body has been removed, leaving only a thin wall and
the PLL intact.
anterior rim
of L3
L2
L4
ascending
lumbar vein
L2 spinous
process
• An expandable titanium cage is appropriately sized and distracted until a press
fit is obtained.
22 Minimally Invasive Lumbar Corpectomy
133
anterior rim
of L3
L2
L4
PLL
ascending
lumbar vein
L2 spinous
process
• The cage is shown in its final distracted position. The bone graft has been
placed inside and around the cage.
Potential Pitfalls
Care should be taken to place the tube along the medial/posterior vertebral body
edge. Placement of the tube too far anteriorly will result in resection of the ante-
rior longitudinal ligament and an inadequate spinal canal decompression. In the
vast majority of cases, the pathology lies along the posterior vertebral body wall
and spinal canal, and an anterior retractor placement will result in inadequate
treatment. Care should also be taken to avoid disrupting the end plate, as cage
subsidence is much greater with corpectomy cages than in single-level disk space
implants.
23 Anterior Lumbar Interbody Fusion
Tips and Pearls Before You Begin
Lateral fluoroscopy is helpful during preoperative localiztion. Localization will help
to minimize tissue dissection and reduce surgical time. Lateral fluoroscopy is also
beneficial during implant placement. The ideal implant position is a few millime-
ters recessed deep to the anterior margin of the adjacent end plates. The osteo-
phytes should be rongeured off the anterior end plates before the diskectomy,
as they may obscure normal anatomy and result in improper placement of the
interbody implant. Once the anterior annulus is incised a Cobb elevator may be
used to detach the Sharpey fibers from the superior and inferior end plates, and
then the disk can be removed in one piece. Overly sclerotic end plates can be
burred to expose the bleeding end plates. Sequential dilation of the disk space
with sizers is an important step to distract the end plates adequately and insert a
press-fit implant.
aorta
ascending
vena
lumbar v.
L3-L4 disk
cava
genitofemoral
nerve
L4
genitofemoral
ureter
nerve
epigastric
L4-L5 disk space
medial sacral
artery
artery and vein
hypogastric plexus
over L5
internal
iliac vessels
L5-S1 disk
sacrum
134
23 Anterior Lumbar Interbody Fusion
135
■ Exposure and Approach
• A lateral fluoroscopic image should be obtained before incision to localize the
surgical level. At the L5-S1 level, the great vessels (aorta/vena cava) have bi-
furcated. At the L4-L5 disk space level, the great vessels are retracted to the
right. At L4-L5, the ascending lumbar vein may need to be ligated to mobilize
the vessels. Once the incision has been made, the fascia of the musculus rectus
abdominis is incised. The fascial incision can made either horizontally (in line
with the skin incision) or vertically, depending upon the surgeon’s preference.
genitofemoral
aorta
epigastric
ureter
nerve
vena
L3
artery
cava
L3-L4 disk
L4
ascending
lumbar vein
rectus fascia
sacrum
• Rectus fascia identified.
136
IV Lumbar Spine
ureter
epigastric
L3-L4 disk space
artery
genitofemoral
nerve
rectus fascia
hypogastric
plexus over L5
L5-S1 disk space
• The muscle belly of the rectus is mobilized. Some surgeons argue that mobiliz-
ing the lateral edge of the rectus results in denervation of the muscle, while
others state that medial mobilization increases the likelihood for abdominal
hernias. Posterior to the rectus is the rectus sheath, which is incised carefully,
exposing the retroperitoneum.
23 Anterior Lumbar Interbody Fusion
137
median
sacral a.
ureter
genitofemoral
nerve
L5
epigastric
L5-S1 disk
artery
iliopsoas
muscle
internal
iliac vessels
• The retroperitoneum is then swept to the left (the patient’s right). Retractors
are placed along the right side of the disk space to hold the retroperitoneum
out of the surgeon’s field of view. Care should be taken to identify the ureter
and to retract it along with the retroperitoneal contents. At L5-S1, the median
sacral artery may need to be ligated or cauterized prior to the disk space expo-
sure. Care should be taken to retract gently against the verterbal body and disk
space, thereby avoiding any undue pressure on the iliac veins.
138
IV Lumbar Spine
L5
L5-S1 disk space
S1
• Once the disk space is identified, an annulotomy can be made with either a
knife or an electrocautery device. This procedure is similar to the end plate
preparation performed during an anterior cervical diskectomy and fusion.
L5 inferior
end plate
trial sizer
S1 superior end plate
• Care is taken to preserve the integrity of the vertebral end plate. End plate
violation may result in implant subsidence and migration. Lateral fluoroscopy
should be used to recess the implant below the level of the anterior vertebral
body margin.
